

Don’t pay ransomware authors – use alternative data recovery options
Malware attacks, particularly ransomware, are by far the biggest danger to your pictures, videos, work, or school files. Since cybercriminals use a robust encryption algorithm to lock data, it can no longer be used until a ransom in bitcoin is paid. Instead of paying hackers, you should first try to use alternative recovery methods that could help you to retrieve at least some portion of the lost data. Otherwise, you could also lose your money, along with the files. One of the best tools that could restore at least some of the encrypted files – Data Recovery Pro.
About the author

Lucia Danes
— Security researcher
Lucia Danes is the news editor at UGetFix. She is always on the move because the eager for knowledge makes her travel around the globe and attend InfoSec events and conferences.
Contact Lucia Danes
About the company Esolutions
References
- 3D rendering. Wikipedia. The free encyclopedia.
- Minecraft OpenGL error on windows 10, Driver does not support OpenGL. Microsoft. Official forums.
- Sandbox. Techopedia. Professional IT insight.
- Andrew. Can I Run Minecraft?. WePC. Site for PC gamers.
FAQ:
Что такое ошибка 65542 в Minecraft?
Ошибка 65542 в Minecraft — это распространенная ошибка, с которой игроки сталкиваются во время игры. Обычно она возникает при проблемах с файлами игры или при конфликте с другим программным обеспечением на вашем компьютере.
Как исправить ошибку 65542 в Minecraft?
Существует несколько быстрых и простых способов исправить ошибку 65542 в Minecraft. Во-первых, можно попробовать перезагрузить компьютер, а затем снова запустить игру. Если это не помогло, можно попробовать проверить целостность игровых файлов с помощью программы запуска игры. Другой вариант — обновить графические драйверы. Если ни одно из этих решений не помогло, возможно, придется переустановить игру.
Можно ли исправить ошибку 65542 в Minecraft без переустановки игры?
Да, можно исправить ошибку 65542 в Minecraft без переустановки игры. Можно попробовать перезагрузить компьютер и снова запустить игру. Если это не помогло, можно попробовать проверить целостность файлов игры с помощью программы запуска игры. Обновление графических драйверов также может решить проблему. Переустановка игры должна быть последним средством, если ни одно из этих решений не помогло.
Почему возникает ошибка 65542 в Minecraft?
Ошибка 65542 в Minecraft может возникать по разным причинам. Она может возникать при конфликте с другим программным обеспечением на компьютере, при проблемах с файлами игры или при устаревании графических драйверов. Она также может возникать при аппаратных проблемах или несоответствии компьютера минимальным системным требованиям игры.
Существуют ли определенные минимальные системные требования для Minecraft?
Да, у Minecraft есть определенные минимальные системные требования, которым должен соответствовать ваш компьютер для запуска игры. Минимальные системные требования включают в себя процессор с тактовой частотой не менее 2,6 ГГц, 4 ГБ оперативной памяти и видеокарту с памятью VRAM не менее 128 МБ
Важно убедиться, что ваш компьютер соответствует этим требованиям, чтобы не столкнуться с ошибками типа Error 65542
Что делать, если ни одно из решений не помогло устранить ошибку 65542 в Minecraft?
Если ни одно из быстрых и простых решений не помогло устранить ошибку 65542 в Minecraft, возможно, придется прибегнуть к более сложным мерам по устранению неполадок. Можно попробовать переустановить игру, обновить операционную систему или проверить наличие конфликтующего программного обеспечения на компьютере. Если проблема не исчезнет, возможно, потребуется обратиться за дальнейшей помощью в службу поддержки Minecraft или к техническому специалисту.
См. также:
- Откройте для себя захватывающие преимущества рыбалки в Minecraft
- ИИ-генератор изображений создает ужасающего ‘первого криптида латентного пространства
- Руководство по продаже аккаунта Clash Royale — шаг за шагом
- Pokemon Go: Раскрытие секретов игры
- Воздействие Пульчинеллы Геншина: Все, что нужно знать
- Узнайте, как получить Aimbot в Call of Duty: полное руководство
- Какая игра Call Of Duty самая лучшая? Непредвзятое сравнение и рейтинг
Способ 2: удаление DisplayLink (если применимо)
Если вы активно используете драйвер DisplayLink, имейте в виду, что эта технология может конфликтовать с версией Minecraft на Java.
Некоторые пользователи, с которыми мы сталкиваемся с ошибкой GLFW Error 65542 всякий раз, когда они пытались запустить Minecraft, подтвердили, что его проблема исчезла навсегда, как только они закончили удаление графического программного обеспечения USB DisplayLink.
Если этот сценарий применим к вам, следуйте приведенным ниже инструкциям, чтобы удалить программное обеспечение DisplayLink USB Graphics с вашего компьютера, чтобы устранить конфликт с Minecraft:
- Нажмите клавишу Win + R, чтобы открыть диалоговое окно «Выполнить». Затем введите appwiz.cpl и нажмите Enter, чтобы открыть меню «Программы и компоненты» .
Введите appwiz.cpl и нажмите Enter, чтобы открыть список установленных программ. - Зайдя в меню «Программы и файлы» , прокрутите список установленных приложений вниз и найдите запись с именем DisplayLink Graphics Driver.
- Когда вам удастся найти его, кликните его правой кнопкой мыши и выберите «Удалить» из контекстного меню, чтобы начать процесс удаления.
- При появлении запроса на подтверждение нажмите Да, затем следуйте инструкциям на экране, чтобы завершить процесс удаления.
- После завершения операции перезагрузите компьютер и снова запустите Minecraft после завершения следующего запуска, чтобы проверить, устранен ли конфликт.
Если этот сценарий неприменим или вы уже выполнили его безуспешно, перейдите к следующему потенциальному исправлению ниже.
SOLVING GLFW Error 65543 WGL and GLFW Error 65542 WGL MINECRAFT ERROR
In this article we are going to solve two errors that can appear in Minecraft 1.19 /1.17 and 1.18, those errors are: GLFW Error 65543 WGL OpenGL and GLFW Error 65542 WGL OpenGL.

These errors often arise when updating TLauncher for Minecraft.
Here is a step-by-step guide to fix OpenGL error 65543 in Minecraft. Follow these 2 simple solutions and your Minecraft GLFW error 65543 OpenGL profile requested but WGL_ARB_create_context_profile is unavailable issue will be fixed.
We will show you two methods, the second one being the one that usually fixes the problem but keep in mind to start with the first one to make sure you have updated DirectX drivers.
Don’t pay ransomware authors – use alternative data recovery options
Malware attacks, particularly ransomware, are by far the biggest danger to your pictures, videos, work, or school files. Since cybercriminals use a robust encryption algorithm to lock data, it can no longer be used until a ransom in bitcoin is paid. Instead of paying hackers, you should first try to use alternative recovery methods that could help you to retrieve at least some portion of the lost data. Otherwise, you could also lose your money, along with the files. One of the best tools that could restore at least some of the encrypted files – Data Recovery Pro.
About the author

Lucia Danes
— Security researcher
Lucia Danes is the news editor at UGetFix. She is always on the move because the eager for knowledge makes her travel around the globe and attend InfoSec events and conferences.
Contact Lucia Danes
About the company Esolutions
References
- 3D rendering. Wikipedia. The free encyclopedia.
- Minecraft OpenGL error on windows 10, Driver does not support OpenGL. Microsoft. Official forums.
- Sandbox. Techopedia. Professional IT insight.
- Andrew. Can I Run Minecraft?. WePC. Site for PC gamers.
Uninstall DisplayLink (If Applicable)
You may not know, but DisplayLink driver has an immense reputation for conflicting java-based Minecraft setup. So, if you are getting this error, you better uninstall the DisplayLink USB Graphics completely.
- Step 1: Press “Windows Key + R” to launch the “Run” dialog box.
- Step 2: Type “appwiz.cpl” inside the box and hit enter to open the “Programs and Features” menu.

- Step 3: Scroll down till you find the “DisplayLink Graphics Driver” option.
- Step 4: Right-click and select the “Uninstall” option from the context menu.
- Step 5: Select “Yes” if you get an authentication prompt and let the driver uninstall from your system completely.
- Step 6: Once uninstalled, reboot your computer and relaunch Minecraft.
The Problem Explained
Minecraft uses OpenGL, which is supposed to help with the rendering load your system experiences while running the game and, to some extent, increase performance, making your gameplay smoother and better overall.
Minecraft is not the only game running OpenGL. Many other games and programs use it too, meaning this specific problem can also be seen on community forums for other popular titles and software, such as Doom, Blender, and Adobe Photoshop.
When it comes to the Minecraft GLFW Error 65542, the reason you’re seeing it can be one of the following:
- OpenGL cannot be found on your system
- Your graphics card driver is outdated, corrupt, or missing
- Faulty or corrupt Minecraft installation files
This issue also seems to be common on computers with a freshly-installed operating system, on which the chances of missing OpenGL files are greater.
Some users reported they couldn’t get into the game for months due to this error, were confused, and did not know what to do.
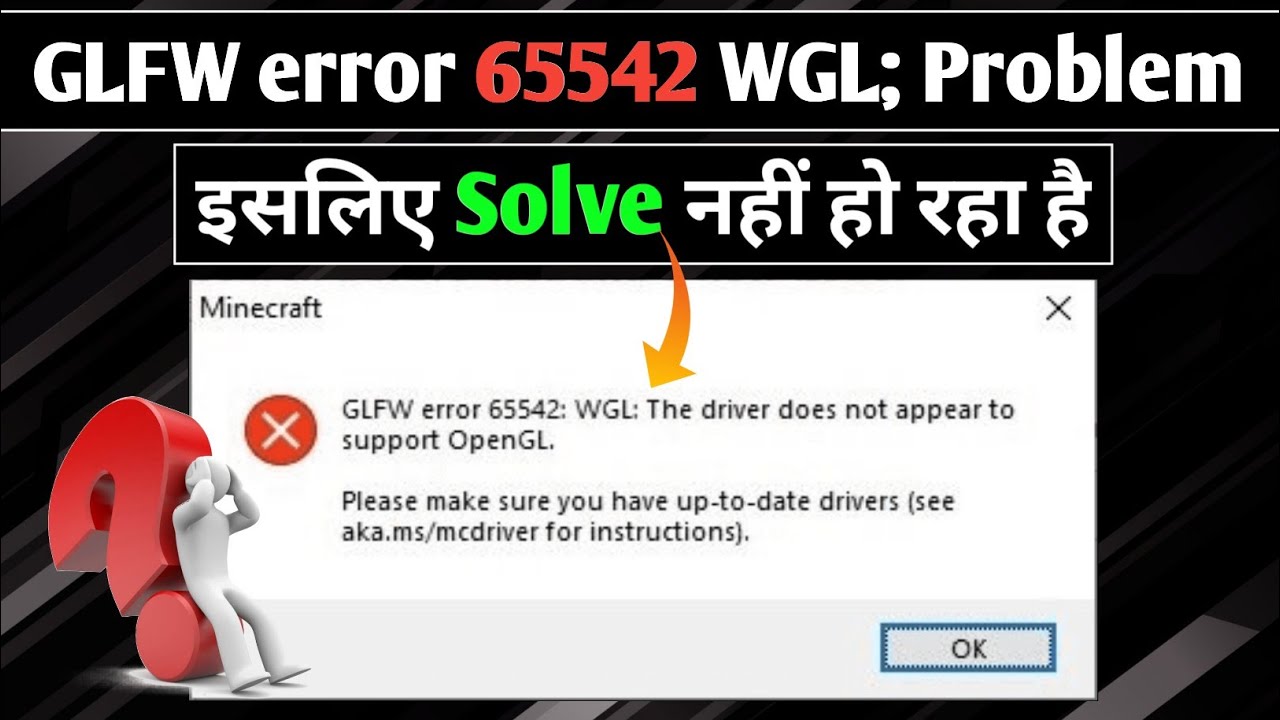
The GLFW Mistake prompt is shown in the image below.
This message suggests updating your graphics drivers, which could be a possible solution to the problem.
We explain how to do that and much more in the guide below, so make sure to carefully go through the sections to apply the fixes flawlessly.
Let’s jump right into it.
Загрузите файл «OpenGL32.dll».
Когда дело доходит до ошибки Minecraft GLFW 65542, исправление с наибольшей вероятностью успеха — это то, когда пользователи загружают файл «opengl32.dll» и добавляют его в корневую папку своей игры.
Хотя этот метод включает в себя загрузку файла со стороннего веб-сайта, мы гарантируем, что он протестирован и безопасен для использования.
Дополнительным доказательством этого будет это видео на ютубе руководство, которое охватывает весь процесс от начала до конца и имеет множество положительных отзывов от довольных пользователей.
Если вы пытались решить эту ошибку в течение достаточно долгого времени и не могли найти решение, у этого есть наибольший потенциал, чтобы наконец помочь вам вернуться к игре Minecraft.
Вот что вам нужно сделать, если вы не смотрели видео выше:
- Загрузите файл «opengl32.dll» из этого репозитория MediaFire.
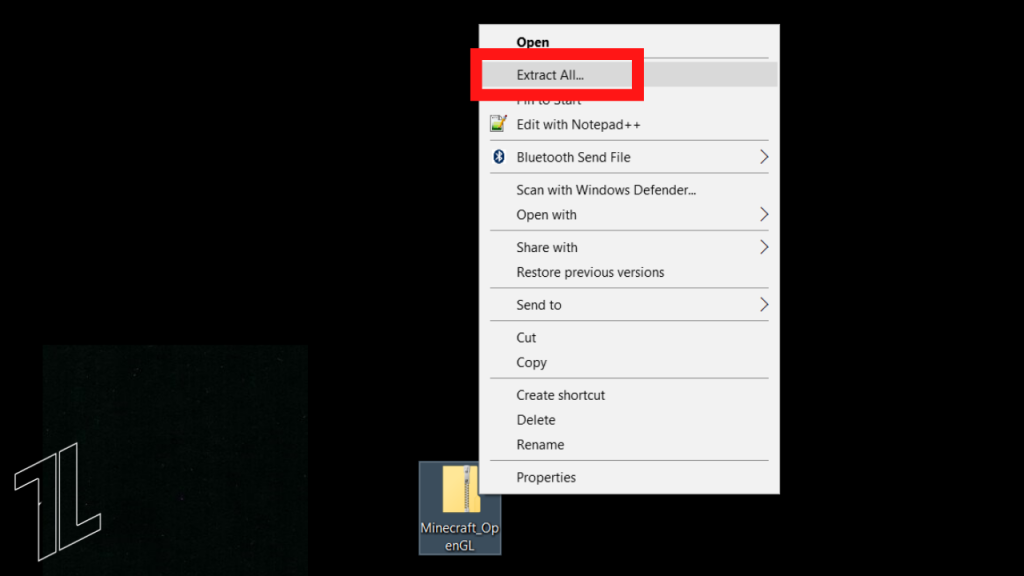
- Откройте файл с расширением «.rar», который вы только что загрузили, используя WinRAR.
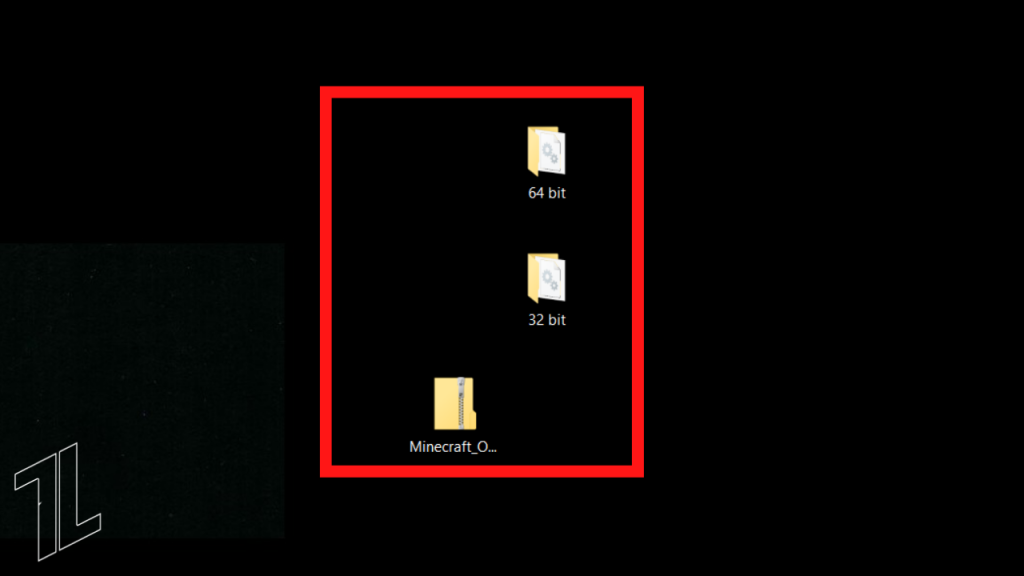
- Выберите 32-битную или 64-битную папку в зависимости от типа вашей операционной системы (подробнее об этом ниже) и скопируйте из нее файл «opengl32.dll» соответственно.
- Затем откройте свой С:Драйви перейдите к Программные файлы.
- Найди Джава папку и откройте ее. Затем откройте «jre» и, наконец, откройте папку Бин папка.
- В папку Bin вставьте ранее скопированный файл «opengl32.dll». Ваш компьютер попросит вас подтвердить действие и заменить файл, так как в этой папке уже будет файл с таким названием. Нажимать Продолжать сделать это.
Примечание: Путь к вашей папке «jre» может отличаться, если вы вручную выбрали место установки Minecraft во время установки.
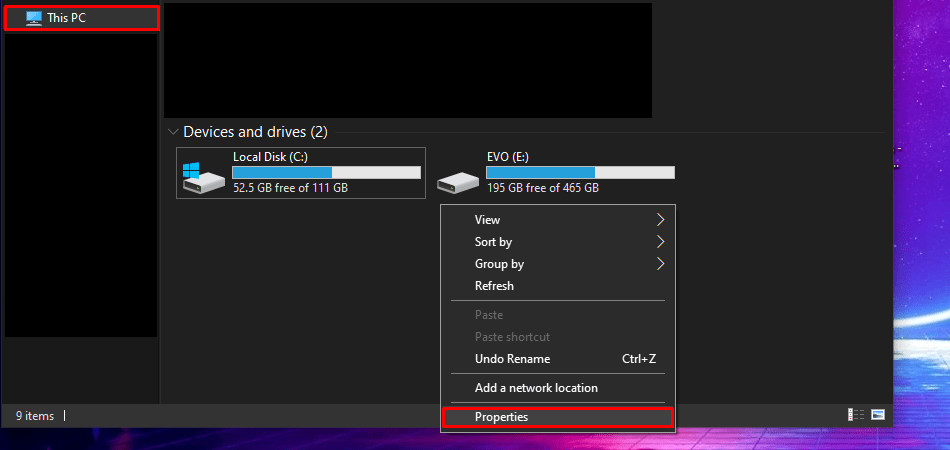
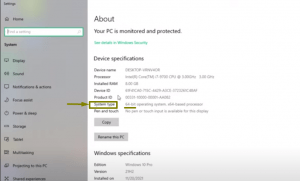
Примечание: Если вы не уверены, является ли ваша система 32- или 64-разрядной, вы можете проверить, открыв Этот компьютер а затем щелкните правой кнопкой мыши пустую область, затем выберите Характеристики открыть Система раздел, который содержит основную информацию о вашем компьютере, как показано на изображениях ниже.

В нашем случае компьютер, используемый для этого примера, имеет 64-разрядную операционную систему, а это означает, что мы будем использовать файл «opengl32.dll» из 64-разрядной папки для решения проблемы.

![[fix] glfw error 65542 in minecraft: driver does not support opengl](https://mtrufa.ru/wp-content/uploads/e/c/1/ec1c9d30122dbce5bb107a3242f73257.jpeg)


![[fixed] glfw error 65542 in windows 10 - minitool partition wizard](https://mtrufa.ru/wp-content/uploads/8/f/9/8f9764bdcc9b74cecee098f437d20eb5.jpeg)


После того, как вы скопируете файл, вы сможете снова запустить Minecraft и играть без дальнейших проблем, поскольку это исправление помогло тысячам пользователей навсегда решить ошибку GLFW 65542.
FIX: Glfw error 65542 wgl
To begin with, you can use general fixes like restarting the system or the internet. Let’s get started with the first fix for Glfw error 65542 wgl on the list:
Advertisement
OpenGL.DLL File
The error states that the driver does not appear to support OpenGL, so let’s start the fix with the exact file:
- Download the OpenGL File on your system.
- Click on the downloaded file & extract the file from the Zip file.
Select between 32-bit or 64-bit according to your OS.
- Open the file & copy the OpenGL.
- Now navigate to Program Files > Java > (Insert your JRE Version).
- Paste the selected OpenGL file into the environment.
Restart your device & launch Minecraft to check the Glfw error. If this didn’t work for you, don’t worry, we still have a few other fixes left.
Updating Windows & Drivers
As the Glfw error 65542 wgl revolves around drivers, try updating your graphic driver & windows. Outdated or corrupt drivers can cause many bugs & issues, especially for games like Minecraft. For updating your drivers:
- Open Device Manager.
- Right-click on your Graphic driver under display adapters.
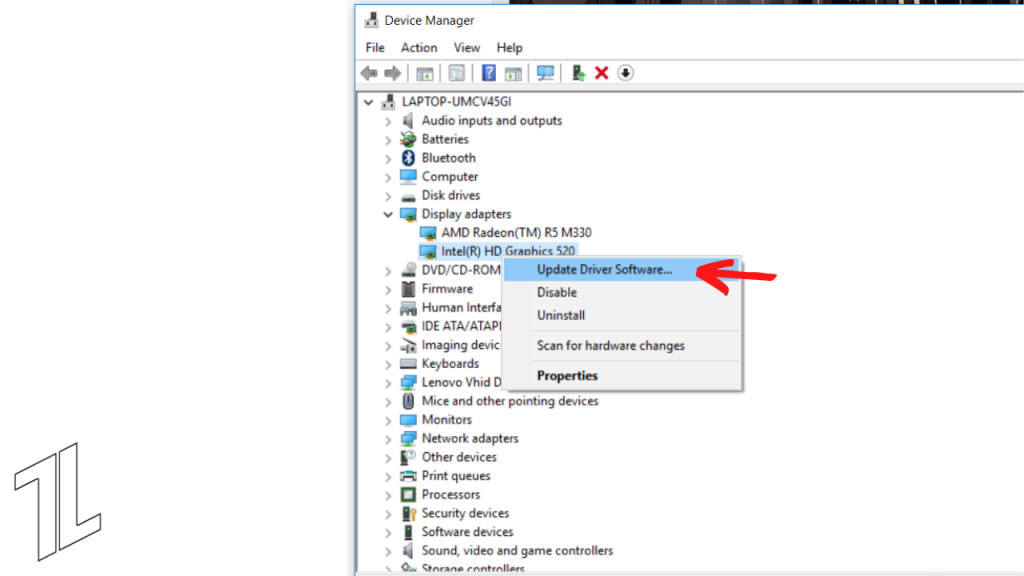
Select Update driver software.
For updating your Windows:
- Search for Windows Update on your system.
- It will show pending window updates if any.

Select Update now. It’ll restart your device.
Check again in Minecraft if the problem gets fixed. If not, then move on to the other fix:
Advertisement
Display Link Driver
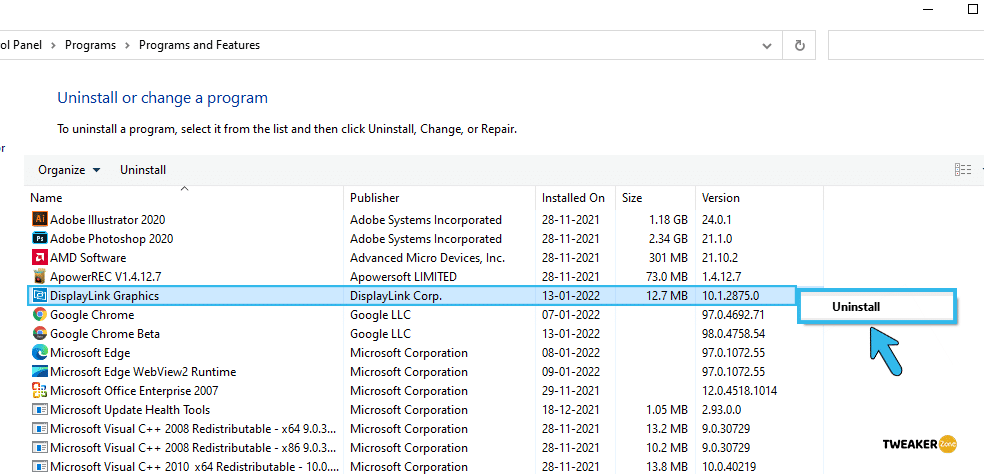
Many users reported removing the Display Link graphic driver fixed the Glfw error 65542 wgl. If you’re using the Display link driver, you need to remove it from your system. Navigate to Programs > Uninstall a program in the Control Panel. Look for the graphic driver. Right-click on it and select uninstall.
That’s it. Restart your system & start Minecraft again & check for the issue. If the error still pops up, there might be a few other reasons. It’s possible that your device no more meets the system requirement after a new update.
In that case, no tweaks in the settings can help. You have to either update your hardware or play a previous patch.
There are still a couple of solutions you should try before giving up on the error.
Java Version
The Java Version in your system does affect Minecraft since it’s written in Java. For updating Java to the latest version, you can either reinstall the entire game or download the updated version manually. Reinstalling the game might prove a better choice since it clears the corrupted game files.
Advertisement
Download Minecraft: Minecraft.net.
Download Java Windows: Java.com.
That concludes our list of fixes for the Glfw error 65542 wgl. If you are somehow still facing the error, you can report the same on Minecraft’s official bug tracker portal: Report a bug.
Исправляйте ошибки автоматически
Команда ugetfix.com делает все возможное, чтобы помочь пользователям найти лучшие решения для устранения их ошибок. Если вы не хотите бороться с методами ручного ремонта, используйте автоматическое программное обеспечение. Все рекомендованные продукты были протестированы и одобрены нашими профессионалами. Инструменты, которые можно использовать для исправления ошибки, перечислены ниже:
Предложение
сделай это сейчас!
Скачать FixСчастьеГарантия
сделай это сейчас!
Скачать FixСчастьеГарантия
Совместим с Майкрософт ВиндоусСовместим с OS X По-прежнему возникают проблемы?Если вам не удалось исправить ошибку с помощью Reimage, обратитесь за помощью в нашу службу поддержки. Сообщите нам все подробности, которые, по вашему мнению, нам следует знать о вашей проблеме.
Reimage — запатентованная специализированная программа восстановления Windows. Он диагностирует ваш поврежденный компьютер. Он просканирует все системные файлы, библиотеки DLL и ключи реестра, которые были повреждены угрозами безопасности.Reimage — запатентованная специализированная программа восстановления Mac OS X. Он диагностирует ваш поврежденный компьютер. Он просканирует все системные файлы и ключи реестра, которые были повреждены угрозами безопасности.Этот запатентованный процесс восстановления использует базу данных из 25 миллионов компонентов, которые могут заменить любой поврежденный или отсутствующий файл на компьютере пользователя.Для восстановления поврежденной системы необходимо приобрести лицензионную версию Reimage инструмент для удаления вредоносных программ.
 Нажмите
Как я могу исправить ошибки OpenGL в Windows 10?
Решение 1. Удалите драйверы дисплея и переустановите последнюю версию
- Для удаления драйверов дисплея перейдите в диспетчер устройств.
- Найдите адаптеры дисплея и щелкните их, чтобы открыть список установленных драйверов.
- Теперь вам нужно найти драйвер видеокарты из списка, в большинстве случаев это будет единственный элемент в списке, щелкните его правой кнопкой мыши и нажмите Удалить.
- После завершения процесса удаления необходимо перезагрузить компьютер.
- Обратитесь к производителю графической карты и найдите последние версии драйверов для вашей модели графической карты.
- Установите драйверы и посмотрите, сохраняется ли проблема.
Если Windows не может автоматически найти и загрузить новые драйверы, ознакомьтесь с этим руководством, чтобы быстро решить проблему.
Хотите последние версии драйверов для графических процессоров? Добавьте эту страницу в закладки и всегда оставайтесь в курсе последних и самых лучших.
Обновление драйверов вручную подвергает ваш компьютер риску, поэтому мы рекомендуем вам загрузить Средство обновления драйверов Tweakbit (одобрено Microsoft и Norton), чтобы сделать это автоматически.
Таким образом, вы защитите свою систему от повреждений, загрузив и установив неправильные версии драйверов.
Отказ от ответственности : некоторые функции этого инструмента не являются бесплатными
Решение 2. Установите последние драйверы дисплея в режиме совместимости
- Найдите название модели вашей графической карты и загрузите последние версии драйверов с сайта производителя.
- По завершении загрузки найдите файл установки драйвера.
- Щелкните правой кнопкой мыши файл установки и выберите «Свойства» в меню.
- Перейдите на вкладку «Совместимость».
- Находясь на вкладке «Совместимость», найдите и выберите «Запустить эту программу в режиме совместимости» и выберите нужную операционную систему в раскрывающемся списке.
- Нажмите OK и запустите установочный файл.
Знаете ли вы, что большинство пользователей Windows 10 имеют устаревшие драйверы? Будьте на шаг впереди, используя это руководство.
Решение 3 – Запустите SFC
Если некоторые системные файлы, используемые в вашей игре, отсутствуют или повреждены, у вас возникнет немало проблем и ошибок, в том числе ошибок OpenGL.
Вы можете быстро решить эту проблему с помощью средства проверки системных файлов. Для этого откройте командную строку от имени администратора и введите команду sfc/scannnow .

Нажмите Enter и подождите, пока ваша система не завершит процесс сканирования. Перезагрузите компьютер и проверьте, сохраняется ли проблема OpenGL.
Если у вас возникли проблемы с доступом к командной строке от имени администратора, то вам лучше ознакомиться с этим руководством.
Команда сканирования теперь остановлена до завершения процесса? Не волнуйтесь, у нас есть простое решение для вас.
Решение 4 – Настройте свой ПК для лучшей производительности
Если на вашем компьютере недостаточно ресурсов для игры, у вас могут возникнуть проблемы с OpenGL и другие проблемы. Поэтому убедитесь, что ваши настройки настроены на максимально возможную производительность игры.
- Зайдите в Настройки> выберите Информация о ПК
- Перейти к расширенным настройкам системы
- Выберите вкладку «Дополнительно»> «Производительность»> нажмите «Настройки».
- Установите флажок Настроить для лучшей производительности.
Вы не можете найти режим высокой производительности на ПК с Windows 10? Ознакомьтесь с этим руководством и решите проблему раз и навсегда!
Если у вас возникли проблемы с открытием приложения Настройка, обратитесь к этой статье, чтобы решить эту проблему.
Как вы можете видеть, большинство ошибок FPS, графических карт и OpenGL в Windows 10 вызваны несовместимостью драйверов с Windows 10.
Для получения дополнительной информации о предмете и других потенциальных исправлениях вы также можете проверить это специальное руководство.
Если эти решения не устранили ваши проблемы, вам придется подождать, пока производители оборудования выпустят новые наборы драйверов, оптимизированные для Windows 10.
Если у вас есть какие-либо другие проблемы, связанные с Windows 10, вы можете найти решение в разделе исправлений Windows 10.
Для получения дополнительных предложений или вопросов, обратитесь к разделу комментариев ниже.
GLFW Error 65542: WGL: The driver does not appear to support OpenGL
Here is how to fix GLFW Error 65542 Minecraft Windows 10 or 11–
1] Manually Add OpenGL32.DLL File to JRE Folder
The display driver in Windows 11 or 10 usually holds all the necessary dynamic link library in short DLL files in most cases. However, some of these might go missing due to reasons like corruption in the system or accidental delete of the file itself. Missing opengl.dll file most likely results in GLFW Error 65542 Minecraft Windows 11 or 10.


![[исправить] ошибка glfw 65542 в minecraft: драйвер не поддерживает opengl](https://mtrufa.ru/wp-content/uploads/c/a/9/ca93e5e80958bd526b74f145b2237f1e.jpeg)


In order to fix the issue, you can simply perform opengl32.dll download and then add it to the JRE (Java directory) manually. Adding this will allow Minecraft to access opengl.dll file and the error will not appear while starting the game. Follow the below steps to add the DLL files to JRE folder –
- Click this link.
- Extract the opengl32.zip file.
- Double click on opengl32 folder.
- Copy the opengl32.dll.
- Now go to –
Note – Please note that, *JRE Version* in the navigation path above is just a placeholder. Replace it with the JRE version you are using. If you have installed the Java environment for Minecraft in a customized location, head to that file instead.
- Right click and select Paste.
- Click Continue when you will get a ‘Destination folder access denied’ pop up.
- If the DLL file is placed correctly in the proper environment, the GLFW Error 65542 Minecraft Windows 10 or 11 should resolve by now.
2] Reinstall GPU drivers using Device Manager
In case, display drivers become obsolete and do not have the capability to run the opengl32.dll file, then you will obviously encounter GLFW Error 65542 Minecraft Windows 11 and 10. The same drawback may also come up if the system had faced malware issues recently resulting in deleting some necessary files required to run the OpenGL.
In order to fix the problem, the best way is to uninstall the drivers associated with GPU and then install them again from official sites. For that, follow the below steps –
- Hit “Win + R“.
- Type devmgmt.msc and press Enter.
- Double click on Display adapters.
- Right-click the display driver and select Uninstall device. Click Uninstall again from the confirmation popup.
- Once the uninstallation gets completed, launch Run again.
- Type appwiz.cpl and click OK to access the Programs and Features window.
- Reach out to the programs related to GPU manufacturer (Nvidia, AMD, or Intel).
- Right-click each and select Uninstall. Follow the on-screen guidelines and finish uninstalling them.
- Once finished uninstallation, restart Windows 10 PC.
- Upon startup, launch a web browser and visit the GU manufacturer’s official web page. Download the latest compatible driver.
- Install them again and try running Minecraft.
3] Uninstall DisplayLink driver to fix GLFW Error 65542 Minecraft Windows 10 or 11
This is a special workaround for the users who are using the DisplayLink driver actively in Windows 11 or 10. This ‘driver’ has potential to conflict with the Java version for Minecraft and thereby cause GLFW Error 65542 Minecraft Windows 11 or 10.
Therefore if you are using DisplayLink USB Graphics Software, uninstall the same to resolve the error and you can run Minecraft again without any issue. To remove, follow the below instructions –
- Type Control Panel in the Taskbar Search and press Enter to access the same.
- Click Programs and Features.
- Reach out to DisplayLink Graphics Driver and right-click on it.
- Select the Uninstall option.
- If User Account Control prompts up for permission, click Yes to give consent.
- Finish the process following the on-screen guidelines.
- Lastly, reboot Windows 10 or 11 and try running Minecraft.
Hopefully, GLFW Error 65542 Minecraft Windows 10 or 11 will not show up anymore. You can reset the game using – How to Reset Minecraft App in Windows 10. In order to get Nether version, follow – How to Download Minecraft 1.16 Nether Update on Windows 10 PC. And to simply update – 4 ways to Update Minecraft in Windows 11 or 10.
Methods:
That’s all!!
How to fix Minecraft glfw error 65542
1. Update java
- Go to Search bar after typing the control panel click here.
- find the java and open the app.
- click to update option and below show the update now.
- click to Update the java software.
problem not solved too
(OR)
2.Download java file
- Go to Browser and click to open it.
- Search the https://www.java.comthis website.
- Show the download and install the Java software.
- Restart your device.
3. Install Visual C++
- Go to open the Chrome Browser.
- Type the Microsoft Visual C++ download and search it.
- See the official page Microsoft C++ redistributable and click the open it

- Get download Visual Studio’s latest software
- Check your system 32bit or 64bit
- X64 Visual C++
- or
- X86 Visual C++
get installed the Microsoft Visual C++
How to Fix GLFW Error 65542 WGL Minecraft in Windows 10
In this article, you can know about glfw error 65542 here are the details below;
However, several users reported that they dealt with ‘GLFW error 65542 WGL Minecraft’ error in their Windows 10 computer system while they attempted to run/play Minecraft game. This Minecraft error is appeared in Windows 10 generally when you try to start Minecraft Launcher. This error shows that you require to update your chauffeurs so they can support OpenGL. Let’s have a look at error message.
If you are not conscious, OpenGL stands for Open Graphics Library is cross-language & platform application shows user interface for rendering 2D and 3D graphics. It is utilized to interact with GPUs (Graphics Processing Units). In Minecraft, OpenGL plays an important role by reducing the rendering load on system which attempts to make the Minecraft video game run faster and smoother on your computer system. Missing OpenGL files and components in computer system can trigger this kind of issue.
Some users reported that GLFW error 65542 WGL Minecraft error can be solved by copying the missing out on ‘OpenGL32.dll’ file manually into Java’s JRE folder in your primary drive of computer system. Also, you can attempt reinstall or upgrade your graphics card driver in order to fix the issue. Updating graphics card driver to most current available build can support OpenGL in your computer system. Let’s go for the solution.
Minecraft is lagging when playing game or stucks or responding slow?
When you are playing Minecraft and you are experiencing slow or lagging issues then this means that your system is not supporting or not enough cable of handling graphics and you need to upgrade your graphic card in this case to fix Minecraft lagging issues or slow responding when playing Minecraft game on your computer.
How to fix glfw error 65542 minecraft Launcher?
Download openGl dll files -> copy and paste dll file in to java folder -> JRE -> Bin folder -> and paste openGL dll file and restart your computer.
Where to replace openGL dll file in mincraft to fix glfw error opengl driver not supporting error?
You need to copy and paste file in this location -> your C drive -> Program Files -> Jave Folder -> JRE -> Bin folder and paste the DLL file.
Workaround for GLFW Error 65543 WGL and GLFW Error 65542 WGL MINECRAFT error

1- To fix this problem, you must first download the missing DLL file, available from the buttons below.

You will need to consider whether your operating system is 64-bit or 32-bit. If you have a 32 bit system you will download the 32 Bit one, otherwise the 64Bit one.
2- After downloading the files that come in Zip format, you must unzip them with WinRAR.

3- Enter the folder and you will see a file named opengl32.dll, right click on it, copy it and go to the local disk C: . In the local disk C go to the folder Program Files.
If you have 64 bits, you must also copy the file opengl32.dll from the 64 bits folder that you have already downloaded and you must repeat exactly the previous steps, but this time you paste it in the Program Files x84 folder, locate the BIN folder and paste it there.

4- After entering the Program Files folder look for the Java folder and once inside you will find only one folder, go into it, locate the BIN folder and paste the file opengl32.dll

5- A pop-up window will appear, asking you if you want to replace the file and you must indicate yes, to replace the file. If you have 32 bits you have already finished the process.
6- Note: If you have 64 bits, you must also copy the file opengl32.dll from the 64 bits folder that you have already downloaded and you must repeat exactly the previous steps, but this time you paste it in the Program Files x84 folder, locate the BIN folder and paste it there.
7- You must now reboot the system before testing Minecraft.
other methods
Minecraft GLFW Error 65542 can be quite frustrating for players, but fear not, as there are a few steps you can take to fix this issue.
Firstly, ensure that you have the latest version of your graphics card driver installed.
Outdated drivers can often cause conflicts with Minecraft, resulting in this GLFW error.
If updating the driver doesn’t resolve the problem, try disabling any overlays or mods that you might have installed.
These can sometimes interfere with the game’s rendering process. Additionally, double-check that your system meets the minimum requirements to run Minecraft smoothly.
If all else fails, you can try reinstalling the game itself. This may help to resolve any corrupted files that could be causing the GLFW Error 65542.
By following these steps, you should be able to get back to enjoying Minecraft without encountering this error.
Переустановка драйвера видеокарты
Возможно, не удается запустить Minecraft по причине того, что установлены устаревшие драйверы видеокарты, которые не поддерживаются графическим стандартом OpenGL. Также известны случаи, когда при сканировании компьютера на наличие вредоносных программ, антивирус отправляет некоторые файлы на карантин, которые требуются для запуска OpenGL, что приводит к ошибке GLFW 65542.
Для удаления графических драйверов предпочтительнее использовать программу DDU. Загрузите утилиту с официального сайта, ссылка на который указана на рисунке.
Затем перезагрузите компьютер в безопасном режиме. Если используете Windows 10, разверните меню Пуск и нажмите на кнопку Питания. Затем удерживая Shift, щелкните на кнопку «Перезагрузка». При отображении окна выбора действия, перейдите по пути: Поиск и устранения неисправностей – Дополнительные параметры. В окне среды восстановления щелкните на Параметры загрузки и нажмите F4 для перезагрузки компьютера в безопасный режим.


![[fixed] glfw error 65542 in windows 10](https://mtrufa.ru/wp-content/uploads/c/f/9/cf93556d9471a9ddd5345103aae06fb8.png)


После запустите утилиту DDU и укажите графический процессор. Для очистки текущих драйверов щелкните на кнопку «Удалить и перезагрузить».
После завершения операции загрузите последнюю версию программного обеспечения из сайта AMD, NVIDIA или Intel, в соответствии с установленной видеокартой.
Запустите загруженный файл и следуйте инструкциям до завершения установки. После перезагрузки ПК запуск Майнкрафт не должен прерываться ошибкой «GLFW error 65542: WGL the driver does not appear to support OpenGL».
Reinstall Graphics Card Drivers
If updating the graphics driver still can’t solve the GLFW error 65542: WGL Minecraft, you should completely uninstall the driver and then reinstall it again. And to do that, follow these steps.
- Step 1: Press “Windows Key + R” to open the “Run” dialogue box on the windows system.
- Step 2: Type “devmgmt.msc” inside the box and hit enter.

- Step 3: Click on “Yes” to grant admin access if UAC pops up.
- Step 4: Under the “Device Manager” window, find “Display Adapter” and expand it.

Step 5: Navigate to your graphics driver and right-click to select the “Uninstall” option (Uninstall both the integrated and dedicated graphics driver)

- Step 6: Reboot the system and then visit Nvidia, AMD, or Intel Graphics driver pages to download the latest driver.
- Step 7: Install the new driver and restart the game.
Your screen may flicker a few times after you uninstall the graphics driver. But don’t worry; this flicker will automatically stop once you install the latest driver package from the official sites of your graphics card.
Fix 3: Temporarily Remove Minecraft Mods
One of the best things about Minecraft is how easily you can mod the game and alter your game experience completely.
This is something that many users do, and if you are one of them, you should be well aware of the potential reliability issues that mods can cause.
The GLFW Error is rarely caused by corrupt or faulty mods, texture packs, and other game-altering files, but they can sometimes be the root of the problem.
Because of this possibility, we recommend temporarily deleting all your folders containing mods and throwing another attempt at running the game. If it works without the mods, you’ll have to go through the list and find the one causing the problem.
More on this matter in one of the sections of .
Method 4: Reinstall or upgrade Graphics card drivers in Windows 10.
This error can also be taken place if your graphics card driver variation does not support OpenGL. You can update graphics card drivers to newest readily available integrate in order to repair the issue.

Step 1: Click ‘Windows + X’ keys on keyboard and choose ‘Gadget Supervisor’.
Step 2: Find and use up ‘Show Adapters’ category, right-click on your graphics card motorist and select ‘Uninstall’ option. Follow on-screen instructions to complete uninstall procedure. Repeat the same step to uninstall all graphics card drivers.
Step 3: After that, open ‘Control Panel’ and go to ‘Uninstall a Program > Programs & Characteristic’, find and choose your graphics card driver software here, and choose ‘Uninstall’. Follow on-screen instructions to complete uninstall from ‘Control Panel’.
Step 4: When done, reboot your computer and after restart, open your internet browser and visit your graphics card manufacturer official website, and download & set up the latest graphics card driver according to your graphics card design and operating system version.
Step 5: Once installed, restart your computer system again and attempt running Minecraft game and inspect if the error is fixed.
Download or reinstall graphics card motorists update in Windows 10 You can likewise attempt to get latest updates for all Windows drivers consisting of graphics card motorists in your computer system. You can get this tool within button/link below.