

Step Three Save the Settings at Runtime
Saving settings is almost as easy. However, there is a minor complication when saving a window’s size. We will see that in the code sample that follows.
The persistence code for settings is generally placed in the event handler for the target window. Create the handler, and add the following code to it:
C#
private void FormMain_FormClosing(object sender, FormClosingEventArgs e)
{

    Settings.Default.WindowLocation = this.Location;


    if (this.WindowState == FormWindowState.Normal)
    {
        Settings.Default.WindowSize = this.Size;
    }
    else
    {
        Settings.Default.WindowSize = this.RestoreBounds.Size;
    }


    Settings.Default.Save();
}
The setting is self-explanatory, but the property has a wrinkle. If a window is normal size, we can read its size property in the usual manner. But if a window is minimized or maximized, the size property will return an inaccurate value. So, .NET provides a property that will return the size of the window in its normal state. But—and here’s the wrinkle—the property returns a valid value only when the window is minimized or maximized. As a result, we have to test the property, and call either the or property based on the results.
Note that we have to call the Settings’ method to save the settings to the config file. And the config file is not the Application.exe.config file—only application settings go there. User settings are saved to different settings files for each user, which are stored in an arcane location. This FAQ explains how to find the settings file, in case you need to get to it.
The Properties Window
The control that was clicked last on a form (or in the pull-down menu of the Properties window) is called the currently selected control. You can identify it by the small squares on its edges, the so-called drag handles. You can drag them with the mouse to change to resize the control. A form becomes the currently selected control by clicking on a free position in the form.
Example: In the last example, button1 is the currently selected control.
In the Properties window (context menu of the control on the form, or View|Properties window – do not confuse with View|Property pages).
the properties of the currently selected control are displayed. The left column contains the names and the right column contains the values of the properties. With F1 you get a description of the property.
The value of a property can be changed via the right column. For some properties, you can type the new value using the keyboard. For others, after clicking on the right column, a small triangle is displayed for a pull-down menu, through which a value can be selected. Or an icon with three dots „…“ is displayed, which can be used to enter values.
Example:
- For the Text property, you can enter a text with the keyboard. For a button this text is the inscription on the button (e.g. „OK“), and for a form the title line (e.g. „My first C++ program“).
- For the BackColor property (e.g. from a button) you can select the background color via a pull-down menu.
- If you click the right column of the Font property and then the „…“ icon, you can select the font of the Text property.
A control on the form is not only adjusted to its properties in the Properties panel, but also vice versa: if you resize it by dragging the drag handles on the form, the values of the corresponding properties (Location and Size in the Layout section) in the Properties panel are automatically updated.
Разработка серверных приложений
Серверные приложения в мире управляемого кода реализуются через хост-приложения. Среда CLR размещается на неуправляемом приложении, что позволяет вашему управляемому коду контролировать поведение сервера. При такой модели вы можете использовать все функции среды CLR и библиотеки классов, добиваясь высокой производительности и масштабируемости сервера.
На рисунке ниже показана основная схема сети и работа управляемого кода в различных серверных средах. Сервер, к примеру IIS или SQL Server, выполняет стандартные операции, а за логику приложения отвечает управляемый код.
Управляемый код на стороне сервера
ASP.NET является средой размещения, позволяющей разработчикам использовать .NET Framework для создания веб-приложений. Между тем, ASP.NET отвечает не только за размещение. Это полноценная архитектура для разработки веб-узлов и объектов, распространяемых через Интернет, с использованием управляемого кода. И веб-формы, и веб-службы XML используют IIS и ASP.NET в качестве механизма публикации для приложений. И те, и другие имеют набор вспомогательных классов в .NET Framework.
Веб-службы XML — это важный шаг вперед в области веб-технологий. Они представляют собой компоненты распределенных серверных приложений и напоминают обычные веб-узлы. В отличие от веб-приложений веб-службы XML не имеют пользовательского интерфейса и не предназначены для обозревателей, будь то Internet Explorer или Netscape Navigator. Веб-службы XML состоят из стандартных программных компонентов, созданных для использования в других приложениях: традиционных клиентских приложениях, веб-приложениях и даже в других веб-службах XML. Благодаря этому технология веб-служб XML значительно ускоряет разработку приложений и их развертывание в высокораспределенной среде Интернета.
Если вам доводилось работать с более ранними версиями технологии ASP, вы сразу же заметите усовершенствования, введенные в ASP.NET в веб-формах. Например, страницы веб-форм можно писать на любом языке, если он поддерживается платформой .NET Framework. Кроме того, код не обязан располагаться в одном файле с текстом HTTP (хотя это не запрещено). Страницы веб-форм выполняются на машинном языке, поскольку, как и любое другое управляемое приложение, они могут в полной мере использовать преимущества среды CLR. Неуправляемые страницы ASP, напротив, всегда пишутся в виде сценария и интерпретируются. Страницы ASP.NET работают быстрее, они более функциональны, их проще разрабатывать, чем неуправляемые страницы ASP, поскольку они взаимодействуют со средой, как и другие управляемые приложения.
В платформе .NET Framework также имеется набор классов и средств, помогающих при разработке и использовании веб-служб XML. Веб-службы XML создаются на основе стандартов: SOAP (протокол удаленного вызова процедур), XML (расширяемый формат данных), WSDL (язык описания веб-служб). Платформа .NET Framework опирается на те же стандарты, благодаря чему развиваются возможности взаимодействия с решениями сторонних разработчиков.
Например, средство WSDL, включенное в комплект .NET Framework SDK, способно запросить веб-службу XML, размещенную в Интернете, проанализировать WSDL-описание службы и создать исходный код на C# или Visual Basic, который можно использовать в приложении, которое станет клиентом данной веб-службы. Исходный код может создавать классы, производные от стандартных классов, включенных в библиотеку, которые будут обрабатывать все базовые связи при помощи анализа SOAP и XML. Библиотека классов позволяет использовать веб-службы XML напрямую, однако средство WSDL, впрочем как и другие средства, входящие в комплект SDK, упрощает разработку приложений в платформе .NET Framework.
Если вы создаете и размещаете собственную службу XML, вы можете использовать набор классов .NET Framework, согласующихся со всеми стандартами, такими как SOAP, WSDL и XML. Их применение позволит вам сосредоточиться на логике службы и не тратить время на инфраструктуру связей, необходимую для распределенных приложений.
И наконец, как и страницы веб-форм в управляемой среде, веб-службы XML работают с высокой скоростью — со скоростью приложений на машинном языке — и используют масштабируемую систему связей IIS.
Ссылки по теме
-
Подписаться на рассылку «Обучение для IT-профессионалов»
- Обратиться в «Интерфейс» за дополнительной информацией/по вопросу приобретения продуктов
C# Привет, мир
Теперь давайте посмотрим на пример того, как мы можем реализовать простое приложение «Hello World» в Visual Studio. Для этого нам необходимо реализовать нижеуказанные шаги.
Шаг 1) Первый шаг предполагает создание нового проекта в Visual Studio. После запуска Visual Studio, вам нужно выбрать пункт меню Создать->Проект.
Шаг 2) Следующим шагом является выбор типа проекта в качестве Windows Формы приложения. Здесь также необходимо упомянуть название и местонахождение нашего проекта.
- В диалоге проекта box, мы можем увидеть различные варианты создания разных типов проектов в Visual Studio, Нажмите Windows вариант слева.
- Когда мы нажимаем Windows варианты на предыдущем шаге, мы сможем увидеть вариант для Windows Формы заявления. Нажмите эту опцию.
- Мы дадим имя приложению. В нашем случае это DemoApplication. Мы также предоставим место для хранения нашего приложения.
- Наконец, мы нажимаем кнопку «ОК», чтобы разрешить Visual Studio создадим наш проект.
Если выполнить вышеуказанные шаги, вы получите следующий результат в Visual Studio.
Выход:-
Вы увидите экран Form Designer.yed in Visual Studio. Именно в этом конструкторе форм вы начнете создавать свои Windows Формы приложения.
В обозревателе решений вы также сможете увидеть решение DemoApplication. Это решение будет содержать следующие 2 файла проекта.


- Приложение формы под названием Forms1.cs. Этот файл будет содержать весь код для Windows Оформить заявку.
- Основная программа под названием Program.cs — это файл кода по умолчанию, который создается при создании нового приложения в Visual Studio. Этот код будет содержать код запуска приложения в целом.
На левой стороне Visual Studio, вы также увидите ИнструментBox, Инструментbox содержит все элементы управления, которые можно добавить в Windows Формы. Элементы управления как текст box или метка — это лишь некоторые элементы управления, которые можно добавить к Windows Формы.
Ниже приведен скриншот того, как инструментbox выглядит как.
Шаг 3) На этом этапе мы добавим в форму метку, которая будет отображать «Hello World». Из инструментаbox, вам нужно будет выбрать элемент управления Label и просто перетащить его на форму.
Перетащив метку в форму, вы увидите ее, встроенную в форму, как показано ниже.
Шаг 4) Следующий шаг — перейти к свойствам элемента управления и изменить текст на «Hello World».
Чтобы перейти к свойствам элемента управления, вам нужно щелкнуть правой кнопкой мыши по элементу управления и выбрать пункт меню «Свойства».
- Панель свойств также отображается в Visual Studio. Итак, для элемента управления меткой в элементе управления свойствами перейдите в раздел «Текст» и введите «Hello World».
- Каждый элемент управления имеет набор свойств, описывающих элемент управления.
Если вы выполните все вышеперечисленные шаги и запустите программу в Visual Studio, ты получишь следующееwing выходной
Выход:-
В выводе вы можете видеть, что Windows Форма отображаетсяyed. Вы также можете увидеть надпись «Hello World».yed на форме.
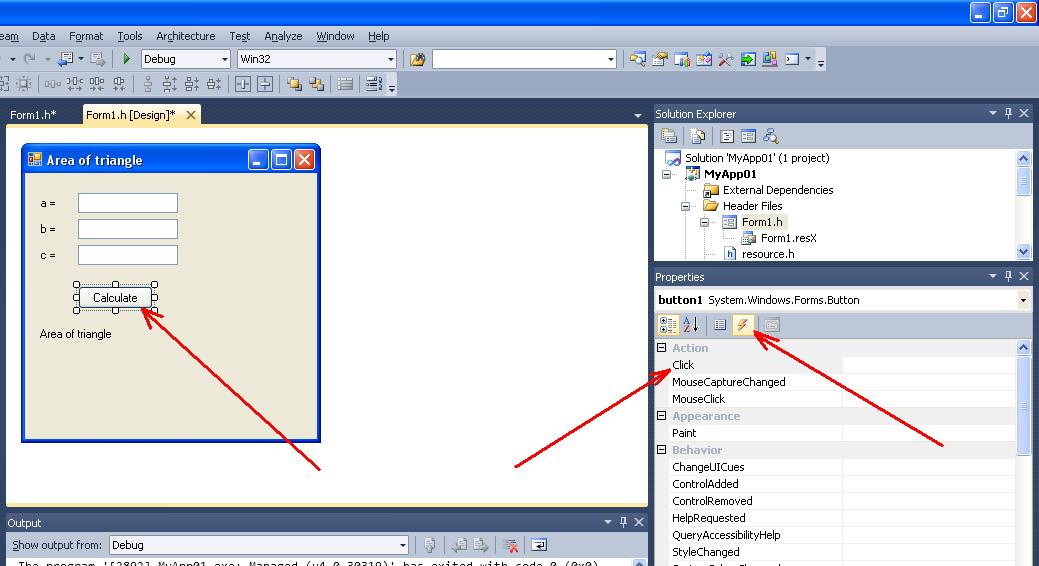
Create an Installer
The next thing we have to do is to create an Installer, which is the component that will register our Service with the Service Control Manager.
To do that, right-click on the blank area in the Design View of the Service1.cs file and select Add Installer from the contextual menu, as shown in the screenshot below:

Once you do that, a new ProjectInstaller.cs file will be added to the project. Save everything (CTRL + SHIFT + S), then open the ProjectInstaller.Designer.cs file and take a look at the InitializeComponent() method, which defines some important settings of our service: its name and display name, the account context used to run it, and so on.
Step One: Create the Settings
The easiest way to create settings is to use the Visual Studio Settings Designer. To get to the designer, open the project’s Properties pages, and select the Settings tab:
As you can see from the Settings grid, settings can have Application scope or User scope. Application settings are those that apply across all users, and that do not change from run to run of the program. Once an Application setting is set in the designer, it can’t be changed in code.
User settings are those that change from user to user, and from run to run of an application. They can be changed in code. User settings are commonly used to store user preferences, such as window size and location. That’s what we’re going to do here.
Fill out the Settings grid so that it looks like this:
The grid is self-explanatory. Note the default values in the Value column. I simply copied these from the Properties of the form. Note that you must include default values in the Values column! If you leave them out, the designer code will declare the settings, but it won’t instantiate them, and any code that calls them will throw a runtime exception.
Once you have entered the settings on the grid, save the project and close the Properties pages.
Our First Form Application
We won’t start with anything other than the classic Hello World application,
this time in forms If you
haven’t read local course, let me repeat that it’s a simple application that
does nothing but write some text.
Create a new project, select Windows Forms Application as the project type.
Type as the project name:
Your Visual Studio window should now look something like this:
Let’s describe its individual parts, which we’ll use to develop form
applications. Important parts are highlighted in red in the image above.
-
Designer — In the Designer we see what the form looks like.
So far, it’s just an empty window. -
Properties — In the Properties window, we can see the
properties of the currently selected element on the form. If you don’t see the
window, enable it in View -> Properties Window. -
Toolbox — Toolbox is a sliding window that serves as a
palette with individual controls that we can add to the form.
Setting control properties
When we select an element on the form or the form itself, we can change the
properties of that element in the Properties window.
Since we got no element on the form, it’s the form what is selected. We’ll
change the title to . Find the property
and enter in it. The result is reflected in the designer
immediately. This way we’ll set the properties of all elements on the form.
Adding Controls to the Form
Now we’ll open the Toolbox and select the control, which
is a text label. We’ll insert it into the form either by double-clicking on it
or by dragging it. Reduce the form size and simply drag the label in the middle.
In the Properties window, set the label to .
As always, you can start your first window application with the green Play
button or the F5 key. You should get a similar result:
First steps in C++
Next, the program from Section 1.5 is to be extended so that instructions are executed in response to user input (e.g., a button click).


Windows programs can receive user input in the form of mouse clicks or keyboard input. All inputs are received centrally by Windows and passed on to the program. This triggers a so-called event in the program.
Such an event can be assigned a function that is called when the event occurs. This function is also called an event handler.
For the time being, our program should only react to the clicking of a button. The easiest way to get the function called for this event is to double-click on the button in the form. The cursor is then placed at the beginning of the function. This causes Visual Studio to generate the following function and display it in the editor:
Between the curly brackets „{“ and „}“ you then write the statements to be executed when the Click event occurs.
Essentially all instructions of C++ are possible here. In the context of this simple tutorial, only some elementary instructions are to be introduced, which is necessary for the basic understanding of Visual Studio. If terms like „variables“ etc. are new to you, read on anyway – from the context you will surely get an intuitive idea which is sufficient for the time being.
A frequently used instruction in programming is the assignment (with the operator „=“), which is used to assign a value to a variable. Initially, only those properties of controls that are also displayed in the properties window are to be used as variables. These variables can then be assigned the values that are also offered in the properties window in the right column of the properties.
For the BackColor property, the allowed values are offered after the pull-down menu is expanded:
These values can be used in the program by specifying them after Color::. If you now write the statement
between the curly brackets
the BackColor property of textBox1 gets the value Color::Yellow, which stands for the color yellow, when button1 is clicked during the execution of the program. If you now start the program with F5 and then click button1, the TextBox actually gets the background color yellow.
Even if this program is not yet much more useful than the first one, you have seen how Visual Studio is used to develop applications for Windows. This development process always consists of the following activities:
- You design the user interface by placing controls from the Toolbox on the form (drag and drop) and adjusting their properties in the Properties window or the layout with the mouse (visual programming).
- You write in C++ the instructions that should be done in response to user input (non-visual programming).
- You start the program and test whether it really behaves as it should.
The period of program development (activities 1. and 2.) is called design time. In contrast, the time during which a program runs is called the runtime of a program.
Windows Forms
Windows Forms, sometimes abbreviated as Winforms, is a graphical user interface
application programming interface (API) included as a part of Microsoft’s .NET
Framework.
Windows Forms allows to create graphically rich applications that are easy to
deploy and update. The applications are more secure than traditional
Windows-based applications.
In December 2018, Microsoft announced releasing Windows Forms as open source
project on GitHub. It is released under the MIT License. With this release,
Windows Forms has become available on the .NET Core framework. Windows Forms is
available on Windows only.
Custom Control in C# Winforms
We can have the following types of Custom Controls in C# or VB.NET
Usercontrols
Usercotrols are the simpler form of custom controls which are derived from the classSystem.Windows.Forms.UserControl. In most cases, UserControls form a compositional approach in which multiple controls are grouped together in a single user interface element.
Example, Login control with username and password text boxes.
Inherited controls
Inherited controls are an extension of an existing control. First you find the preexisting.NET control that most closely matches your desired functionality. Then you inherit that class with extended features such as additional behaviours and properties.
Example of Inherited controls are Cutom button control(explained below) , ExtendedRichTextBox Control, etc.
Owner-drawn controls
Owner-drawn controls normally draw user interfaces from beginning using GDI+ routines. They inherit the System.Windows.Forms.Control class. Because they are built up from scratch the Owner-drawn controls need the most effort to make , but they can offer the most adaptable user interface.
Extender providers
These widgets are a fantastic method of creating an adaptable user interface because they extend the functionality of existing controls on a form.
C# Custom Button Control
In this post, we are going to see how can we creating custom controls. As an example, we will create a custom button control. The example is a Specialized C# button control which changes its look and feels when mouse hovers over it.
If not active the button will appear as shown in the below screenshot.

When you hover mouse over the button(focus on the button) the look and feel of the button changes as below and the cursor type also change to hand type.

Now let’s see the steps involved in creating this special button control.
- Launch Visual Studio and Create a Windows control library project Name it as SpecialButton. By default, it will create a Usercontrol class.Delete the same since we are not creating a user control here.
- Now right click on the project and Select Add New item.Select Custom Control from the list.Name the control as SpecialButton(you can choose whatever name you want).
- Go to source code window and add the following code.
- Build the solution successfully.Your custom control library is ready now. Feel free to customize the code if you want more affect.For example the above code works on mouse events only. Forgetting it work on tab key you need to use events like,
For the time being, we will concentrate on the above-mentioned code with mouse events to understand the basics of creating custom control in C#.
Разработка клиентских приложений
Клиентские приложения больше всего напоминают классические приложения для системы Windows. Это приложения, отображающие на экране компьютера окна или формы, позволяющие пользователю выполнять те или иные задачи. Клиентским приложением может быть текстовый редактор, электронная таблица, а также бизнес-приложения: средства ввода данных, создания отчетов и т. д. В клиентских приложениях обычно используются окна, меню, кнопки и другие элементы графического интерфейса. Очень часто они осуществляют доступ к локальным ресурсам, например к файловой системе, и периферийным устройствам, например к принтерам.
Другая разновидность клиентских приложений — это традиционные элементы управления ActiveX (теперь на смену им пришли элементы управления Windows Forms), развертываемые через Интернет в виде веб-страниц. Они мало чем отличаются от других клиентских приложений: работают как готовые приложения, осуществляют доступ к локальным ресурсам и имеют графический интерфейс.
Раньше такие приложения создавались либо с использованием C или C++ и классов Microsoft Foundation (MFC), либо при помощи среды быстрой разработки приложений, к примеру Microsoft Visual Basic. Платформа .NET Framework объединила в себе возможности этих продуктов, предоставив целостную среду разработки, в значительной степени упрощающую создание клиентских приложений.
Классы Windows Forms, имеющиеся в .NET Framework, предназначены для разработки графического интерфейса пользователя. Они упрощают создание командных окон, кнопок, меню, панелей инструментов и других графических элементов, обеспечивая гибкость, необходимую для удовлетворения меняющихся потребностей бизнеса.
Например, в .NET Framework есть ряд простых свойств, при помощи которых можно изменить атрибуты, определяющие внешний вид форм. В некоторых случаях система, в которой разрабатывается приложение, не позволяет менять эти атрибуты напрямую. Тогда платформа .NET Framework создает форму заново. Это лишь один пример того, как в платформе .NET Framework осуществляется интеграция интерфейса разработки, упрощается и систематизируется написание кода.


В отличие от элементов управления ActiveX элементы Windows Forms осуществляют доступ к компьютеру пользователя в режиме частичного доверия. Это означает, что бинарный или готовый код к одним ресурсам системы пользователя может иметь доступ (например к элементам графического интерфейса и части файлов), а к другим не может. Благодаря управлению доступом для кода многие приложения, которые раньше приходилось устанавливать в системе пользователя, теперь можно развертывать через Интернет. Приложение может выполнять функции локальной программы, но при этом работать в виде веб-страницы.
Функции среды CLR
Среда CLR отвечает за управление памятью, работу потоков, выполнение кода, проверку безопасности кода, компиляцию и другие системные службы. Эти функции включены в управляемый код, выполняемый в среде CLR.
Управляемым компонентам присваиваются разные уровни доверия на основании ряда факторов, связанных с их происхождением (Интернет, корпоративная сеть, локальный компьютер). От уровня доверия зависит способность управляемого компонента осуществлять доступ к файлам, реестру и прочим важным функциям даже в пределах одного активного приложения.
Среда отвечает за управление доступом для кода. Например, пользователь может указать, что тот или иной исполняемый файл, встроенный в веб-страницу, может показывать анимацию или проигрывать мелодию, но не может осуществлять доступ к персональным данным пользователя, файловой системе или сети. Это позволяет максимально расширить возможности надежного программного обеспечения, развертываемого через Интернет.
Кроме того, среда обеспечивает стабильность кода за счет применения инфраструктуры, осуществляющей проверку кода и типов — так называемой системы общих типов CTS. Система CTS гарантирует наличие полного описания в каждом управляемом коде. Как у Майкрософт, так и у сторонних разработчиков есть различные компиляторы, создающие управляемый код по стандарту CTS. Такой код может потреблять другие управляемые типы и экземпляры, неизменно сохраняя правильность и безопасность типов.
Управляемая среда также помогает устранить многие распространенные проблемы, связанные с программным обеспечением. Например, структура объектов и ссылки на них в среде CLR обрабатываются автоматически и освоождаются, когда перестают использоваться. Такое автоматическое управление памятью позволяет устранить две ошибки, наиболее часто встречающиеся в приложениях: утечку памяти и недействительные ссылки.
Кроме всего прочего, среда CLR повышает эффективность разработки. Независимо от того, на каком языке программист пишет приложение, он в полной мере может использовать все функции среды CLR, библиотеку классов и компоненты, написанные другими разработчиками на других языках программирования. Если поставщик решит создать компилятор приложений для среды CLR, он вполне может это сделать. Подобный компилятор позволяет использовать функции платформы .NET Framework в коде, написанного на соответствующем языке, благодаря чему значительно упрощается процесс миграции готовых приложений.
Среда разрабатывалась для приложений нового поколения, однако она отлично поддерживает существующее программное обеспечение. Совместимость управляемого и неуправляемого кода позволяет разработчикам не отказываться от необходимых компонентов COM и библиотек DLL.
При разработке среды целью было повышение производительности. Хотя в среде CLR доступно множество стандартных служб, управляемый код никогда не бывает интерпретируемым. Функция, известная как JIT-компиляция, позволяет выполнять любой код на машинном языке той системы, на которой он запускается. В то же время, диспетчер памяти устраняет возможность ее фрагментации и корректирует размещение ссылок, за счет чего мы получаем дополнительное повышение производительности.
Наконец, среда может располагаться на высокопроизводительных серверных приложениях, таких как SQL Server 2008 и службы IIS. Такая инфраструктура позволяет использовать при создании бизнес-логики управляемый код, сохраняя при этом высокий уровень производительности, характерный для передовых производственных серверов, поддерживающих размещение среды.
Introduction
This morning, for the first time, I was jealous of VB.NET programmers. The namespace makes loading and saving user settings pretty easy, and it’s pretty well documented. Unfortunately, C# programmers don’t have anything quite as slick as the namespace, and the procedure for persisting user settings is not well-documented.
It turns out that it is pretty easy to persist user settings in C#, and this article will show you how to do it. We’re going to stick to the basics—nothing fancy. We will use as our example a Windows Forms “Hello World” program that does nothing but show a window with the canonical text:
We will create settings for the application window’s size and location properties, and we will persist them between runs of the program. The project code can be downloaded from the link at the top of this article.
How to Use the Custom Control in C#
- Create a normal windows form project. Reference the above created SpecialButton Control library dll.
- You can see the SpecialButton displayed in the toolbar top left if the project inside the same solution as SpecialButton control library.
- If the control library is an independent solution and Test project is part of another solution then you need to Add the control to the toolbox.For that go to the bottom of ToolBox and Right click. Select Choose Items from the context menu.Now Go to .NET Framework Components tab.Click the Browse button and choose your library(SpecialButton) from the bin folder.
- Now you can see the custom control listed in the bottom of tool box as below.
- Drag & drop the SpecialButton to your form and set the button name and Text.I named the button as btnSpecialButton and gave caption Test as Test Button. In the button click event write the following code to ensure button work as expected.
Run your WinForm project Test the button.On mouse enter t the button you get the highlighted effect with Hand cursor.
On Click, you get the message box.
On mouse leave the button go back to default state.