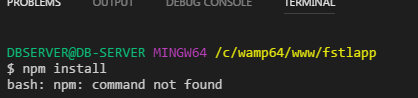
What is the npm command not found Error?
The error can appear when you install or upgrade npm.
On Windows, the cause of this error could be that a PATH or system variable is not correctly set. The error can also occur if you do not have npm or Node.js installed, have an outdated version, or have permission issues.
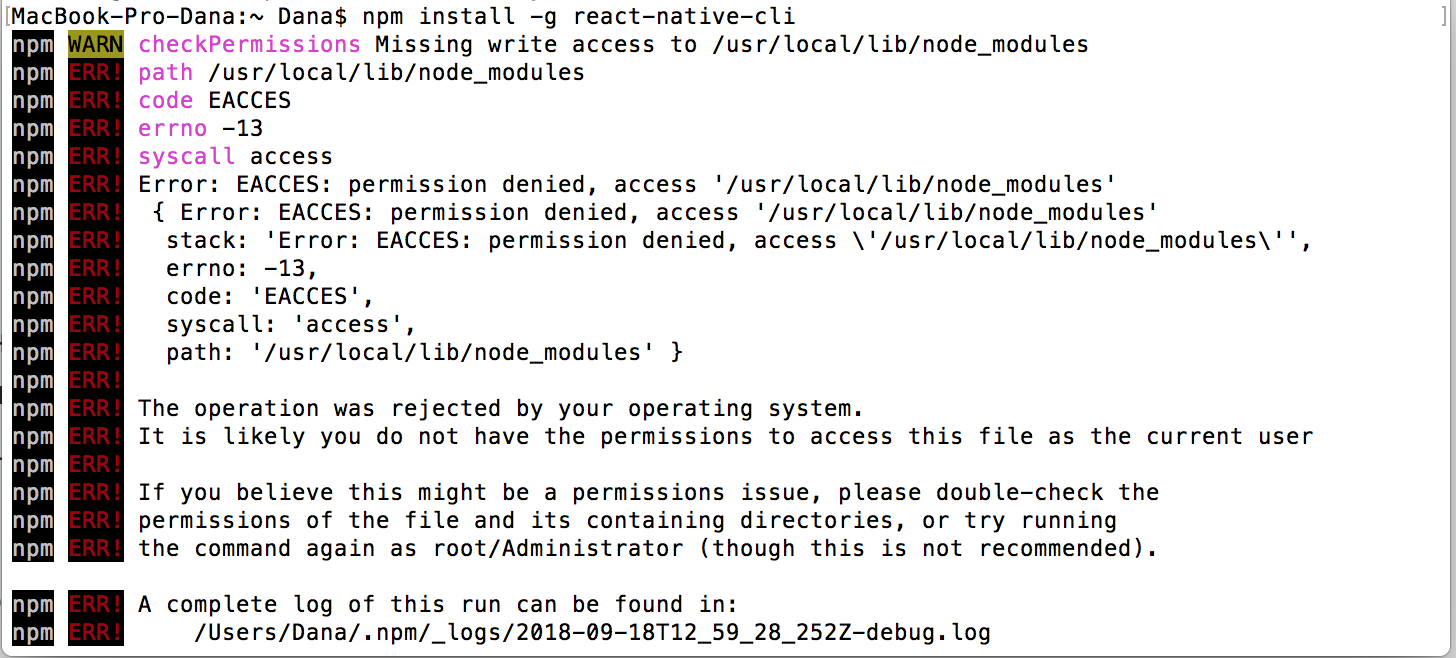
Mac users seeing the npm command not found error could be due to missing files on your computer or a permissions issue.
This article addresses those possible reasons. First we cover general causes related to installation, then go into Mac-specific solutions, before addressing how to fix a potential missing PATH variable on Windows.
Set the PATH to point at the Git installation
You will need to set (add) the following paths to the system variable as shown below. The steps I will be describing are exactly the same on Windows 10 and Windows 11.
C:\Program Files\Git\bin\
C:\Program Files\Git\cmd\
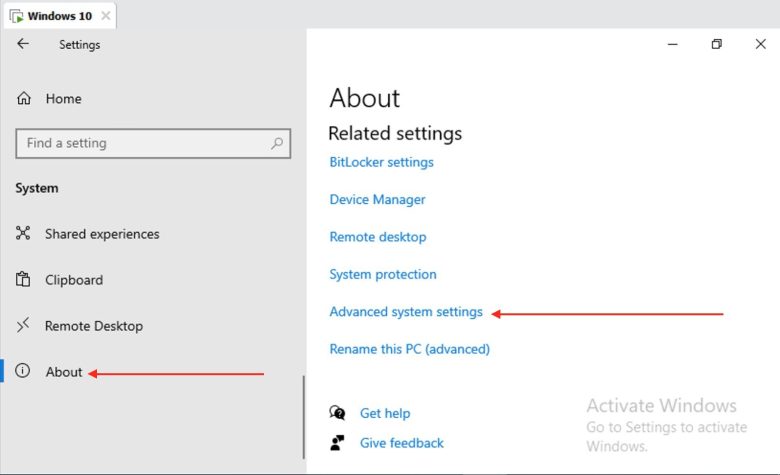
In the Start Menu, and click on as shown below. – Alternatively, you can use the taskbar search, search for “environment variable” or right-click on and then click on .

This will open the Settings window as shown below. Click on
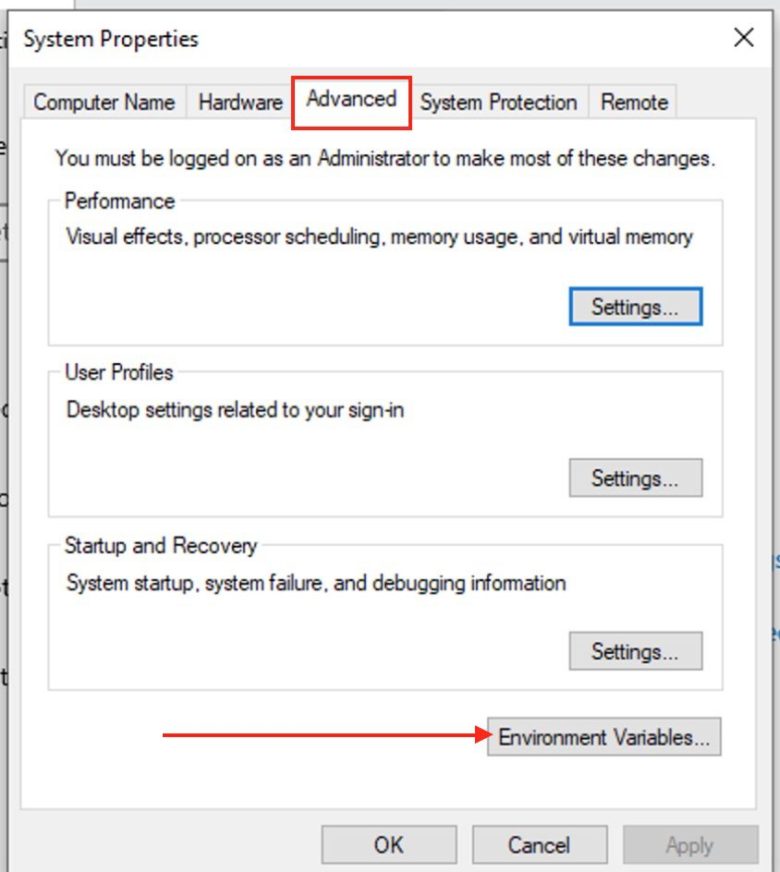
Navigate to the menu and on the right-hand window, click on .
Click on the as shown below. Click the “Environment Variables” button at the bottom.
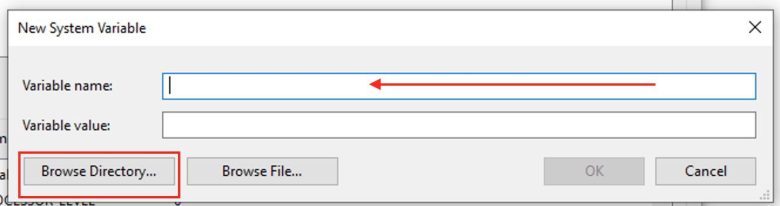
Let’s create a . To do this, click on as shown below.
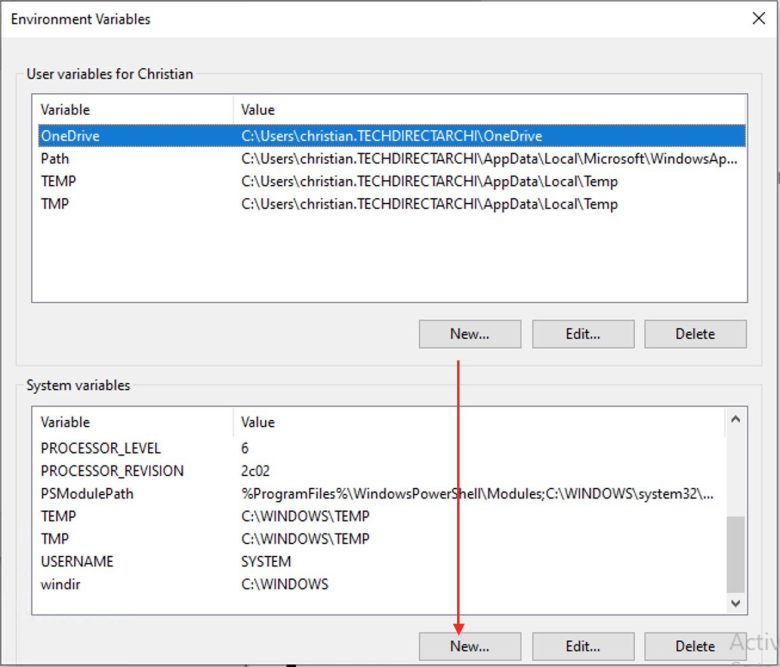
ATH editor, add and to the end of the list.
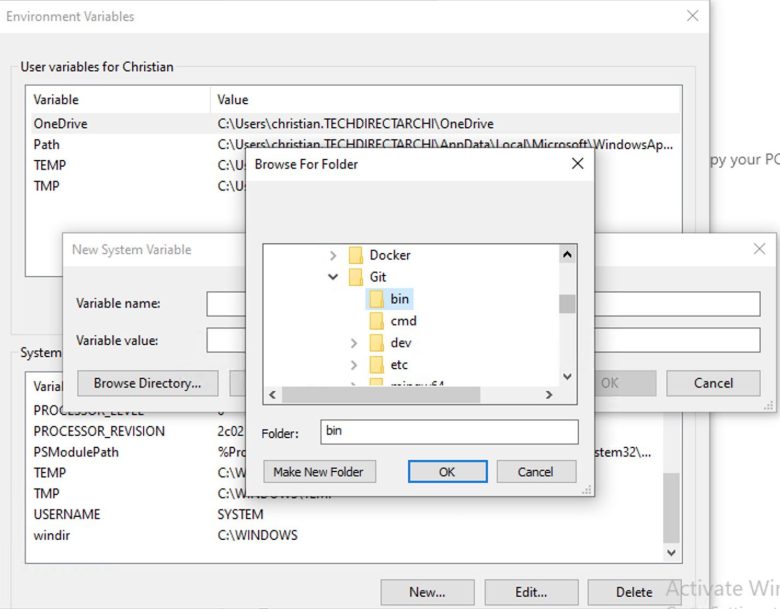
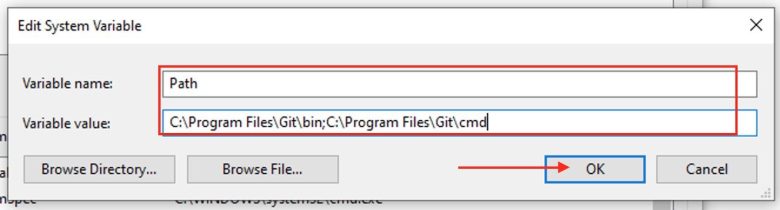
As you can see below, the system variable has been configured and set.
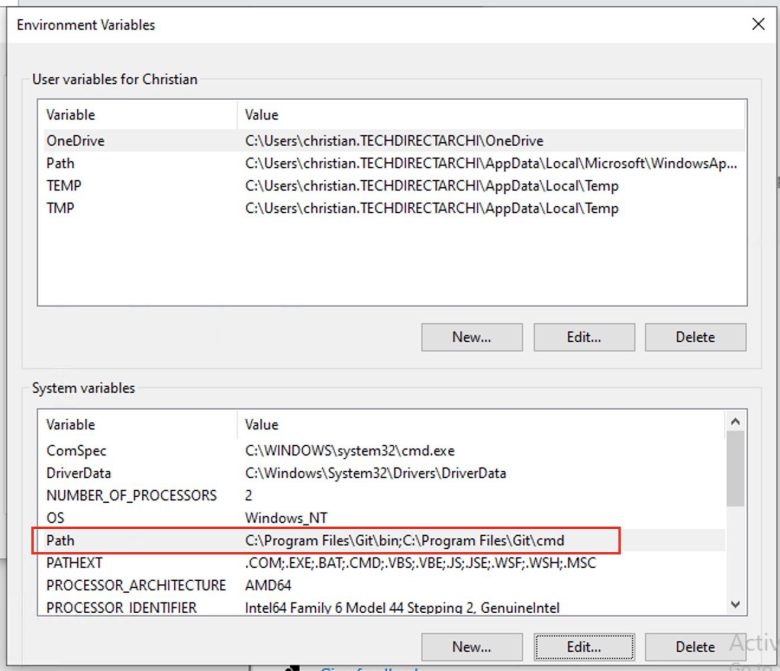
Note: After creation, you can select the system variable and click on Edit to edit the path. Now, you can close the . Here is a similar guide discussing how to resolve “Running Docker commands returns Docker is not recognized as an internal or external command“.
What is NPM
NPM, or Node Package Manager, is a NodeJS package manager. A package manager allows you to specify the dependencies for your project, stating that this tool or site requires these specific third-party components in order to run (or develop). It will then figure out what they need and download it for them automatically. The following are major advantages of using the npm package manager:
- It deals with recursive dependencies.
- The dependencies can be re-assembled as needed and do not need to be stored in your repository.
- You can easily specify and change the version of these packages on which you rely.
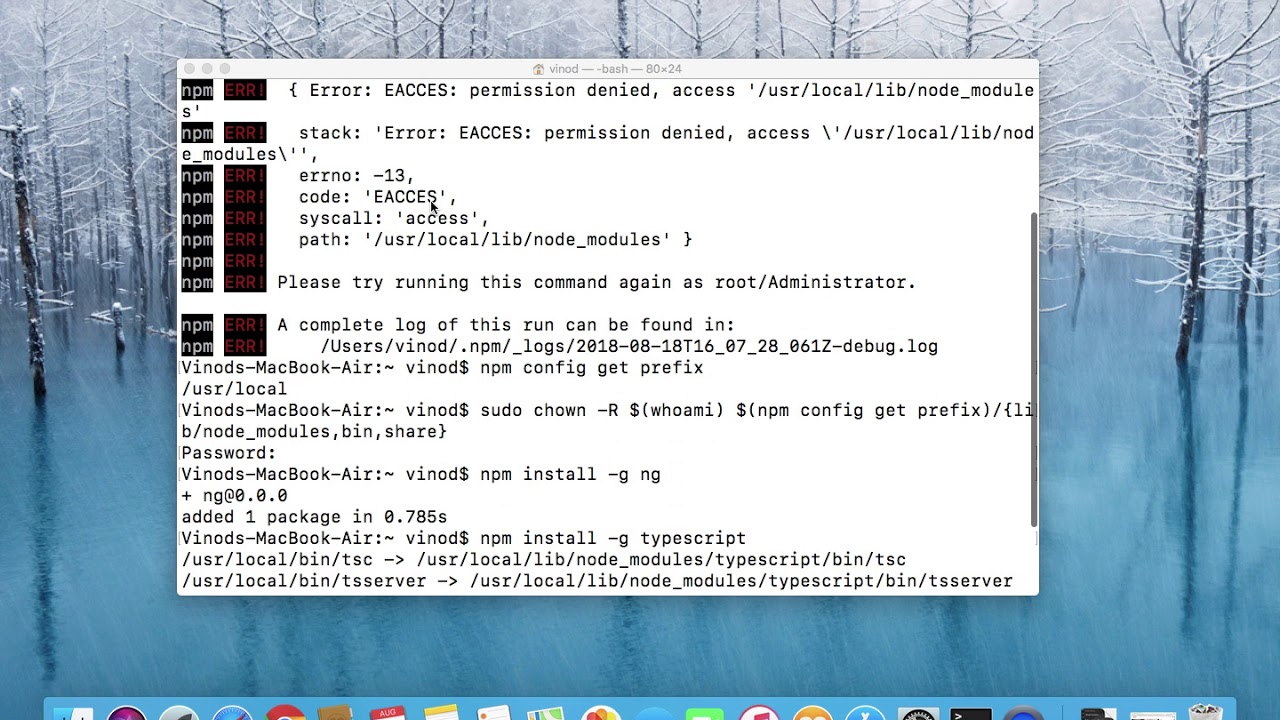
Permissions errors
Пожалуйста, ознакомьтесь с обсуждениями в » Downloading and installing Node.js and npm » и » Resolving EACCES permissions errors when installing packages globally » , чтобы узнать, как избежать и устранить ошибки разрешений.
Как обновить node.js до последней версии
Node.js является популярной платформой для разработки серверных приложений на языке JavaScript
Обновление node.js до последней версии важно для получения новых функций, исправления ошибок и улучшения производительности. В этом руководстве мы расскажем о том, как обновить node.js на вашем компьютере
1. Удаление предыдущей версии
Первым шагом необходимо удалить предыдущую версию node.js с вашего компьютера. В зависимости от операционной системы, процесс удаления может немного отличаться:
- Для Windows:
- Откройте «Панель управления».
- Выберите «Программы» или «Программы и компоненты».
- Найдите node.js в списке программ.
- Щелкните правой кнопкой мыши на node.js и выберите «Удалить» или «Изменить/Удалить».
- Следуйте инструкциям на экране, чтобы завершить удаление node.js.
- Для macOS:
- Запустите «Finder».
- Перейдите в папку «Applications» (Программы).
- Найдите node.js в списке установленных программ.
- Перетащите значок node.js в корзину.
- Очистите корзину, щелкнув правой кнопкой мыши на иконке корзины и выбрав «Очистить корзину».
- Для Linux:
- Откройте терминал.
- Введите команду вида , чтобы удалить node.js.
- Введите пароль, если потребуется.
- Следуйте инструкциям на экране, чтобы завершить удаление node.js.
2. Установка новой версии
После успешного удаления предыдущей версии node.js можно перейти к установке новой версии:
- Откройте веб-сайт https://nodejs.org в вашем интернет-браузере.
- На главной странице найдите кнопку «Скачать».
- Выберите рекомендуемую («Recommended») версию для вашей операционной системы и архитектуры процессора (32-битная или 64-битная).
- Нажмите на ссылку для скачивания.
- Дождитесь окончания загрузки файла установщика.
- Запустите файл установщика.
- Следуйте инструкциям на экране, чтобы выполнить установку node.js.
3. Проверка установки
После завершения установки node.js рекомендуется проверить, что все прошло успешно:
- Откройте терминал или командную строку.
- Введите команду и нажмите клавишу «Enter».
- Убедитесь, что вывод команды показывает номер версии node.js без ошибок.
- Введите команду и нажмите клавишу «Enter».
- Убедитесь, что вывод команды показывает номер версии npm (пакетного менеджера node.js) без ошибок.
Поздравляю! Теперь у вас установлена и настроена последняя версия node.js на вашем компьютере. Вы готовы использовать все возможности и преимущества, которые предлагает эта мощная платформа для разработки.
Проблема с командлетом «Gulp»
Существует несколько возможных причин появления этой ошибки:
- Необходимо установить Gulp:
Первым шагом, убедитесь, что Gulp установлен на вашей системе. Если он еще не установлен, необходимо выполнить следующую команду в командной строке: . При этом будет установлена глобальная версия Gulp, которую можно использовать для всех проектов.
Проверьте наличие установленных пакетов:
Если Gulp был успешно установлен, следующим шагом является проверка наличия правильных пакетов в вашем проекте. Убедитесь, что в вашем файле имеется раздел «devDependencies» с правильной версией Gulp. Если этот раздел отсутствует, выполните следующую команду в командной строке: . Это обновит ваш файл и установит Gulp как devDependency.
Проверьте путь до командлета «Gulp»:
Возможно, проблема заключается в неправильно настроенных путях. Убедитесь, что путь до командлета «Gulp» указан правильно. Обычно, командлет «Gulp» находится в папке «node_modules/.bin/gulp» в вашем проекте. Проверьте настройки PATH вашей системы и убедитесь, что этот путь присутствует.
Переустановите Gulp:
Если вы провели все вышеперечисленные действия и проблема все еще остается, попробуйте переустановить Gulp. Для этого выполните следующие команды в командной строке:
Затем повторите шаги по установке Gulp в вашем проекте.
Необходимо отметить, что проблемы с командлетом «Gulp» могут возникать по разным причинам. Если вы все еще не можете решить проблему, рекомендуется обратиться к документации Gulp или обратиться за помощью к сообществу разработчиков.
Solution 4 – Path or system variable changed resulting in npm error
Although, Path and variables are set by default when you install Node.js and npm in Windows and Ubuntu. But in rare cases, it doesn’t happen. Or maybe you messed up with it. Even in that case, you will get the npm command not found error.
Let’s see how to check and set up PATH variables for npm in the case of Ubuntu 22.04
How to check the npm path variable in Ubuntu 22.04
First, you need to make sure, npm is installed, if not, follow the How to install node JS and npm in Ubuntu 20.04 steps in this post.
Step2 – Check /etc/environment file for the npm path
Now we need to check, do we have /usr/bin/npm or your npm command path in /etc/environment file.
As you will see, /usr/bin is already part of my environment variable. So I will not get this error. In case you don’t have your npm path in this file, add it.
Step3 – Edit /etc/environment file and add npm path
Add the npm path till bin folder at the end of the environment file, separated by a colon “:”. Save and exit from the file. Make a note, the npm path should be within quotes” “.
For example, /usr/bin in my case.
Reload the environment file for changes.
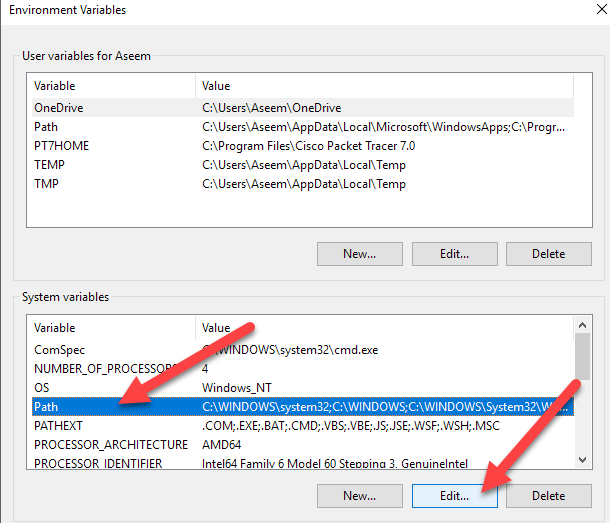
How to check the npm path variable in Windows
First, you need to make sure, node js and npm are installed in Windows. If it’s already there, you need to follow these steps
Step1 – Search for the environment variable
Step1.1 – Type “environment variable” in the search box and click open.
Step 1.2 – Click on “Environment variables” in the Advanced tab of System Properties.
Step 1.3 – Select “Path” and then click Edit.
Step1.4 – Check for npm path “C:\Program Files\nodejs“. It is the default target directory for Node.js and npm.
If the npm variable path doesn’t exist, Click New > Add npm variable path “C:\Program Files\nodejs” > Click OK.
Please make a note, that you need to replace the default “C:\Program Files\nodejs” with your custom target Folder. In case you have selected a different folder during installation.
Click OK twice to close all open dialogue boxes.
Какие ошибки возникают при распознании имени командлета
Возможные причины ошибки
- Опечатка в названии команды: проверьте правильность ввода имени командлета. Попробуйте снова, убедившись, что команда написана без ошибок.
- Устаревшая версия npm: некоторые команды могут быть доступны только в более новых версиях npm. Проверьте, что у вас установлена последняя версия npm и обновите ее при необходимости.
- Конфликт с другими установленными пакетами: некоторые пакеты могут иметь конфликты с определенными командами npm. Проверьте, что у вас нет установленных пакетов, которые могут вызывать ошибку. Если есть, попробуйте удалить или обновить их.
- Необходимость установки дополнительных пакетов: некоторые команды могут требовать наличия определенных пакетов для их работы. Проверьте документацию или сообщения об ошибках, чтобы узнать, какие пакеты нужны, и установите их при необходимости.
Решение проблемы
- Проверьте правильность написания команды и повторите попытку.
- Обновите версию npm до последней версии.
- Проверьте наличие конфликтующих пакетов и удалите или обновите их при необходимости.
- Установите дополнительные пакеты, если это требуется для работы команды.
Если проблема не решается, обратитесь к документации npm или к сообществу разработчиков для получения дополнительной помощи.
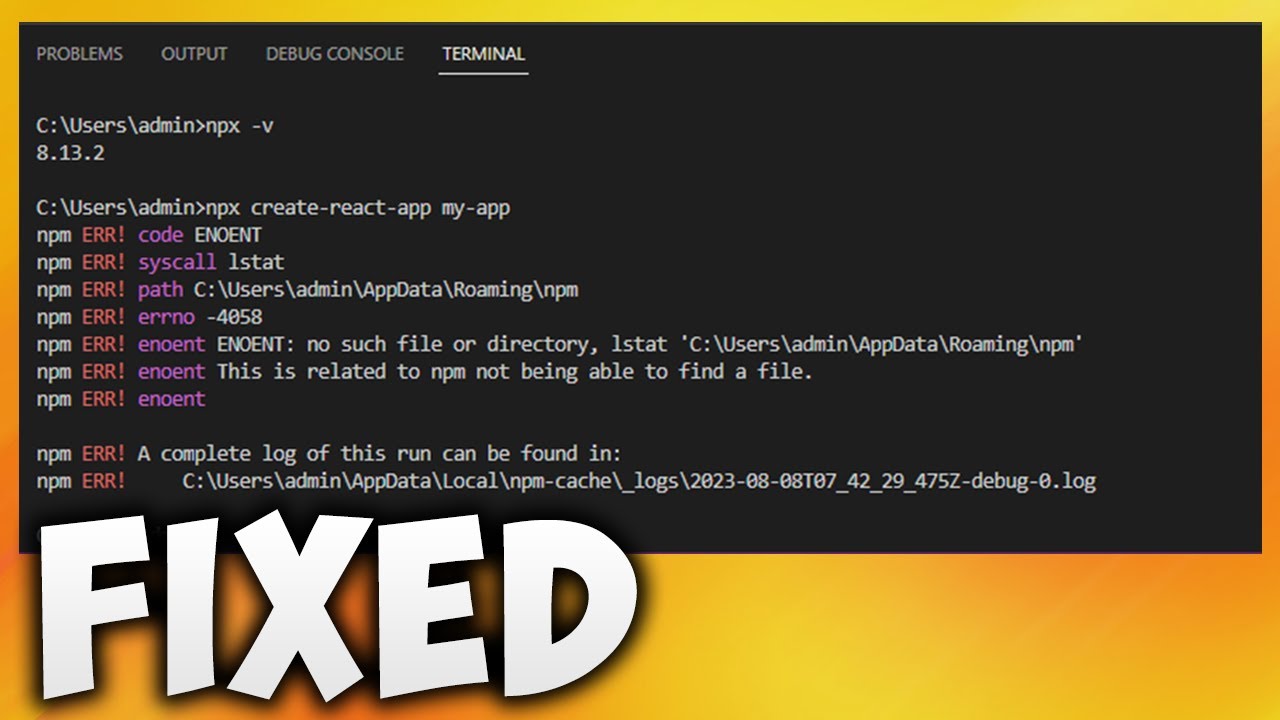
Error: ENOENT, stat ‘C:\Users\\AppData\Roaming\npm’ в Windows 7
Ошибка в Windows 7 является следствием ошибки joyent/node#8141 и является проблемой установщика Node для Windows. Обходной путь — убедиться, что существует и доступен для записи под вашей обычной учетной записью пользователя.
Invalid JSON
- Возможен временный сбой реестра npm или поврежден кэш локального сервера. Запустите и/или повторите попытку позже.
- Это может быть вызвано корпоративными прокси-серверами, которые предоставляют HTML-ответы на запросы . Проверьте прокси-сервер npm configuration .
- Убедитесь, что проблема не в пакете, который вы пытаетесь установить (например, неверный ).
Troubleshooting «npm command not found» on Linux
Complete the following steps to troubleshoot the error in Linux:
1. Confirm that npm is installed.
2. Check the npm installation directory PATH and system variables.
3. Check user permissions.
Check if npm is Installed on Linux
To confirm if npm is installed, access the terminal window, and check the npm version using the following command:
If you receive the npm: command not found error, install Node.js and npm using the instructions for your Linux distribution.
Install npm on Ubuntu/Debian
Note: Installing Node.js and npm from the official Ubuntu/Debian repository may lead to the installation of an outdated Node.js version. To obtain the latest Node.js version, learn how to install the latest Node.js version on Ubuntu or how to install Node.js on Debian.
1. Update the apt package lists using the following command:
2. Use the apt command-line tool to install npm:
Note: If Node.js is not installed, the system proceeds to install both Node.js and npm from the Ubuntu repository.
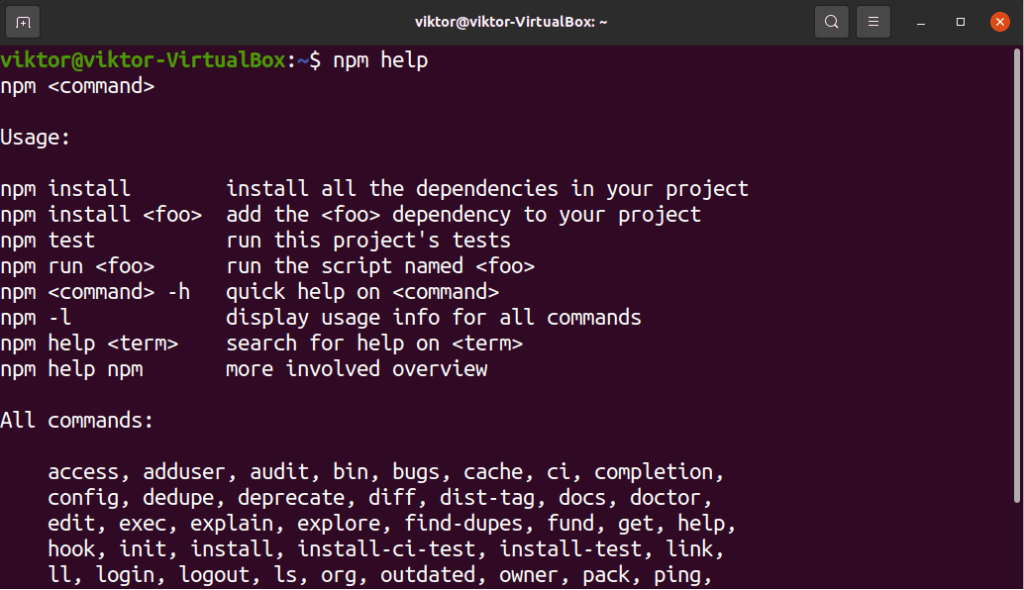
3. Once the installation is complete, type to view the command Usage page:
The usage page contains essential commands and information, including the npm version you installed.
Install npm on Rocky/Fedora
Note: Installing Node.js and npm from the official repository of your Linux distribution has the fewest steps but may result in installing an older Node.js version. Use the Node Version Manager (nvm) to install the latest Node.js version on CentOS and other RHEL-based distributions.
1. Enter the following command to install npm on RHEL-based Linux distributions like Fedora or Rocky Linux:
Note: If Node.js is not installed, the system proceeds to install npm, Node.js, and Node.js dependencies.
The Complete! message indicates that npm is installed.
Use the which command to view the npm installation directory path:
sudo which npm
Check Path Variables on Linux
Enter the following command to check if the npm installation directory is in the system’s PATH:
The output must contain the path to the npm installation directory. The default npm installation directories are or .
If the npm installation directory path is not present, update the PATH to include the directory where npm is installed.
To set the system’s PATH environment variable in Linux:
1. Use a preferred text editor, in this example, nano, to access the .bashrc file:
2. Append the following line at the end of the .bashrc file:
Replace with the npm installation directory path on your system.
3. Save the file and close the text editor.
4. Enter the following command to apply the changes:
5. Restart the terminal to complete the PATH update.
6. Use the echo command to confirm the new PATH variable has been added:
Check Permissions on Linux
The system may return the error if the user lacks the appropriate permissions for the npm installation directory.
npm creates the node_modules directory by default to track locally installed packages via the package.json file.
Use the chown command to give your user the necessary permissions for the node_modules directory:
Replace with the node_modules path on your system.
Conclusion
You have successfully resolved the npm: command not found error and can continue using npm to install and manage Node.js packages.
Find out how the package.json file works and use it to automate the management of Node.js package dependencies.
Solution
First we’ll need to make sure we have the right prerequisites installed, and then we make sure the environment variable configuration is ok.
Time needed: 10 minutes
How to fix “The term ‘yo’ is not recognized as the name of a cmdlet, function, script file, or operable program.” on your Windows machine?
-
Install yo and gulp globally
A good way to get started is to verify you actually have yo – the yeoman generator – and gulp – the task runner – installed. Because maybe you do have them already, but maybe you don’t.This step is conveniently skipped in most tutorials I’ve found, because it’s obvious everyone always has such household names on their machines, right? :)Who WOULDN’T have yo installed on their machine, right? Ah, but after this step, you will, too!
-
Verify your environment variables
Now you’ll need to make sure you have the npm directory in your Path environment variable.You can verify this somewhat like in the screenshot below (this obviously applies to Windows only):Note, that in this example I added it to the User variables, but if you installed the tools globally, you could add it to System variables too (those are exposed to all users of your machine – the values are simply concatenated).
-
Restart your console
To refresh the environment variables you need to restart your terminal/console/shell session. So whichever flavor of a command line you’re using, restart it now.
-
Make sure you’re running the right terminal
Still not working? Ok, let’s get to the non-obvious part.yo, gulp and other tools like that rely on their installation path being added to the Path environment variable – but that variable can be set per-user, just like the tools can be installed to a certain user only. So if you’re using multiple user accounts because your tooling requires that, make note of this, too.The “-g” flag makes sure that yo & gulp are installed globally (on step 1), but that still doesn’t mean their installation paths would be in each user’s Path variable.You can verify which values your current terminal’s Path environment variable has by executing this:You might even want to look for the value somewhat like “C:\Users\YourUser\AppData\Roaming\npm” because that’s where yo and gulp should be in.
-
Restart your machine
… I’m sorry for being that guy. If all else fails, before buying a mac, you can always try rebooting your machine.
Alright. Hope that was just confusing enough to give you some food for thought, but useful enough to help you overcome the error.
votes
Article Rating
Key Takeaway
The ‘npm command not found’ can be a major pain when you are working to develop an application and can’t access an important directory like npm. Without npm you don’t have access to the libraries for Node.js, and will spend significant extra time coding simple and common features by hand.
This article was broken down into three major sections for the operating systems Windows, Linux, and MacOS. This was to allow you easy access to solutions that would be helpful for your system, without requiring you to wade through non-useful information.
The four primary causes of the ‘npm command not found’ error are Node.js and/or npm not installed, path and system variables not set properly, outdated Node.js, and permissions conflicts. The solutions across all three operating systems are fairly simple and straightforward. If you were not familiar with command line (terminal, bash, etc) commands, you may have learned some useful commands in these solutions. Let us know in the comments section which solution worked, or if we have left out anything!
Solution 2 – How to fix the npm command not found error in Linux
I have taken an example of Ubuntu 22.04 OS for output shared in the tutorial.
Debian-based Linux Distributions
- Open a terminal window on your Debian-based Linux distribution.
- Update the package list by running the following command:
- Install the Node.js package by running the following command: . It will install the npm package also.
- Verify that Node.js and npm are installed by running the following commands:
- (This should print the version number of Node.js.)
- (This should print the version number of npm.)
Below-mentioned is the screenshot for your reference. I have installed the latest version of node v19.9.0 and npm 9.6.3 for Ubuntu 22.04
Red Hat based Linux Distributions
- Open a terminal window on your Red Hat based Linux distribution.
- Update the package list by running the following command:
- Install the Node.js package by running the following command: . The NPM package will automatically install
- Verify that Node.js and npm are installed by running the following commands:
- (This should print the version number of Node.js.)
- (This should print the version number of npm.)
Congrats! you have fixed the “Bash or sudo: npm command not found” error by installing npm and Node.js.
If you are interested in the latest version of npm and Node.js installation. Checkout out this tutorial on Node.js and npm using the Node Source repository
Как исправить ошибку
Если при попытке выполнить команду node, на консоли появляется сообщение о том, что команда не является внутренней или внешней, то, скорее всего, проблема связана с оболочкой командной строки Windows.
Сначала необходимо убедиться, что node установлен и находится в переменной среды PATH. Для этого нужно открыть терминал и выполнить команду node -v. Если выводится версия node, то все в порядке. Если же выводится сообщение о том, что команда не найдена, необходимо добавить путь к установленному node в переменную среды PATH.
Если переменная PATH настроена правильно, то причиной может быть неправильно настроенная оболочка. Рекомендуется использовать оболочку Git Bash, которая устанавливается вместе с Git. Для этого нужно вместо командной строки запустить Git Bash и выполнить все команды, которые нужно выполнить с помощью node.
Если же node используется для запуска сервера, то необходимо убедиться, что все зависимости установлены корректно с помощью команды npm install. Если ошибка сохраняется, то можно попробовать переустановить node или зависимости.
Итак, причиной ошибки может быть неправильно настроенная переменная PATH, неправильно настроенная оболочка, проблемы с зависимостями и сам node. В каждом из этих случаев есть решение проблемы, которое можно найти, выполнив несколько шагов по диагностике ошибки.
Добавление пути к системным переменным
Часто при работе с терминалом или сервером возникает проблема, когда программа не может быть выполнена из-за отсутствия пути к исполняющему файлу. Может быть необходимо добавить внешнюю или внутреннюю команду для выполнения задачи. В таких случаях необходимо добавить путь к системным переменным.
В случае Node, нужно добавить путь к оболочке командной строки, чтобы иметь возможность запустить Node из консоли или терминала.
Для добавления пути к системным переменным на Windows нужно выполнить следующие действия:
Нажмите Win+R на клавиатуре, чтобы вызвать меню «Выполнить».
Введите «sysdm.cpl» и нажмите Enter.
Откроется окно «Системные свойства». Нажмите на кнопку «Переменные среды».
В разделе «Переменные среды системы» выберите переменную Path и нажмите на кнопку «Изменить». Если переменной нет, то нужно создать новую.
В поле «Значение переменной» добавьте путь до папки, в которой расположен исполняемый файл для Node
Обратите внимание, что каждый путь должен быть разделен точкой с запятой.
Нажмите на кнопку «ОК».
Перезагрузите терминал или консоль для обновления переменной Path.
Теперь можно запустить Node из терминала или консоли.
Создание символической ссылки на исполняемый файл Node.js
Когда вы устанавливаете Node.js на сервер Windows, он не всегда создает символическую ссылку на исполняемый файл Node.js. Это может привести к ошибке «Node не является внутренней или внешней командой».
Для исправления этой ошибки вам нужно создать символическую ссылку на исполняемый файл Node.js. Для этого необходимо выполнить следующие действия:
- Откройте командную строку (терминал) или оболочку Windows.
- Перейдите в папку, где установлен Node.js.
- Создайте символическую ссылку на исполняемый файл Node.js с помощью команды mklink:
| mklink node.exe «C:Program Filesnodejsnode.exe» |
| Замените «C:Program Filesnodejsnode.exe» на путь к исполняемому файлу Node.js на вашем сервере. |
После выполнения этих действий вы должны успешно выполнить команды Node.js в вашей командной строке (терминале).
Дополнительные сведения о командлете «Gulp»
Командлет Gulp позволяет программистам создавать и запускать задачи, которые могут быть выполнены последовательно или параллельно. Он основан на потоковой системе, где входные файлы проходят через различные этапы обработки, определенные программистом.
При использовании командлета Gulp, разработчик создает файл с конфигурацией, который описывает задачи, которые нужно выполнить. Этот файл обычно называется «gulpfile.js». Внутри него определены различные задачи, которые могут быть запущены командами.
Для того чтобы использовать командлет Gulp, нужно сначала установить его глобально на компьютере с помощью команды «npm install -g gulp-cli». После этого, в директории проекта нужно установить локальные зависимости с помощью команды «npm install gulp —save-dev». Это позволит использовать Gulp внутри проекта.
Командлет Gulp имеет широкую популярность в сообществе разработчиков и используется во многих проектах для автоматизации рутиных задач. Он часто используется в современных фронтенд-разработках для оптимизации рабочего процесса и повышения производительности.
Customizing PATH Environment for Enhanced Command Line Control
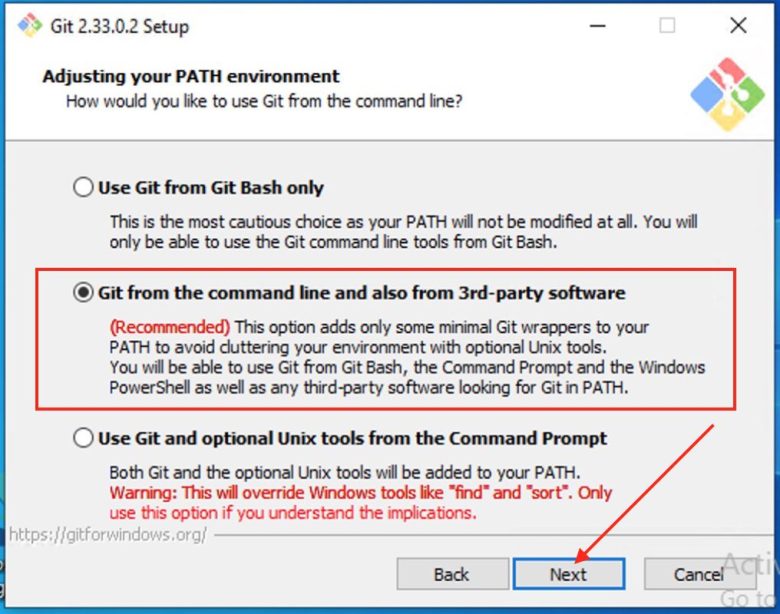
Consequently, I will be selecting the second option. This allows you to change the PATH environment. Similarly, The PATH is the default set of directories included when you run a command from the command line. Leave this on the middle (recommended) selection and click Next.
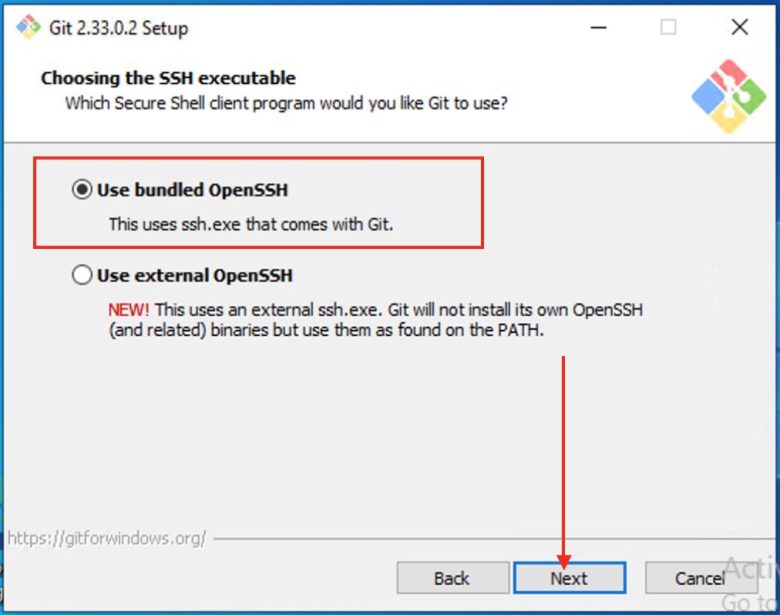
I will be selecting the Use bundled OpenSSH as shown below. I will click on Next to proceed.

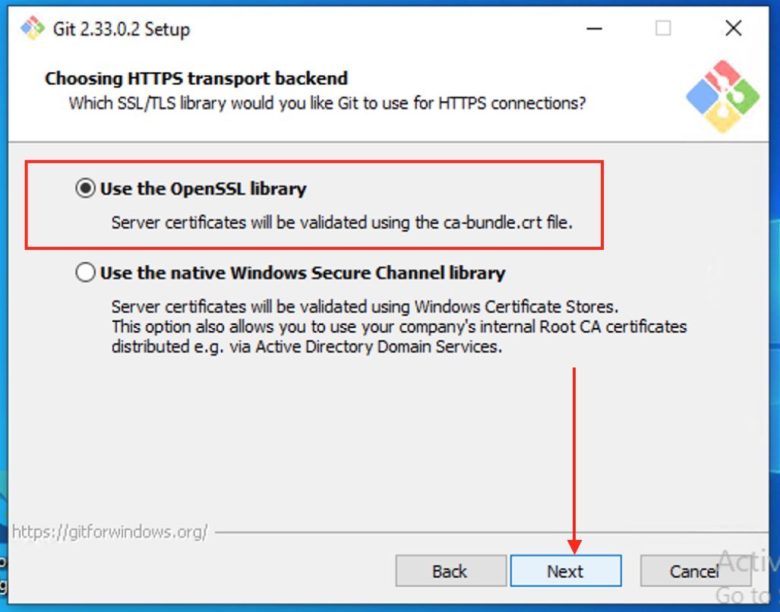
Nevertheless, The below window relates to server certificates. Most users should use the default. Therefore, If you’re working in an Active Directory environment and you have a Certificate Authority server set up, you may need to switch to Windows Store certificates. Click Next.
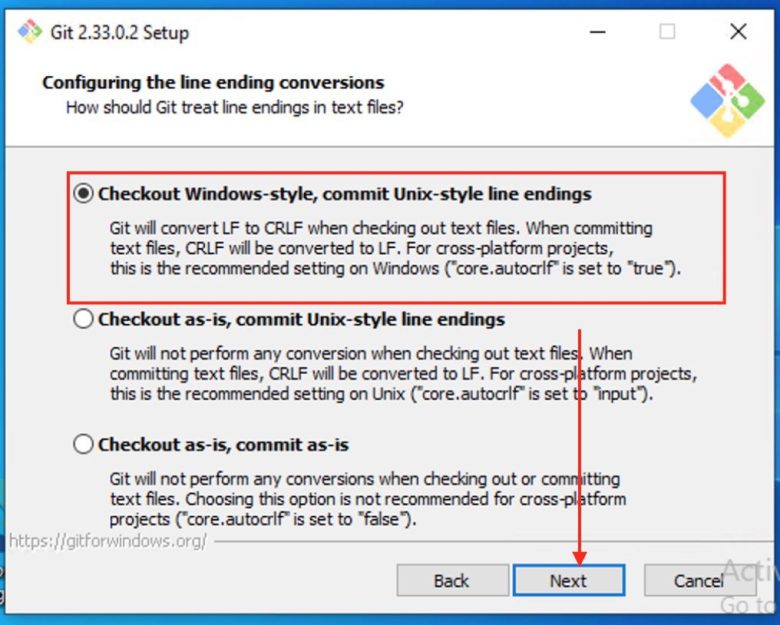
Additionally, I will be selecting the very first option as it converts line endings. It is recommended that you leave the default selection. Furthermore, This relates to the way data is formatted and changing this option may cause problems. Click on Next.
However, I will be using the second option. Click on Next to continue.

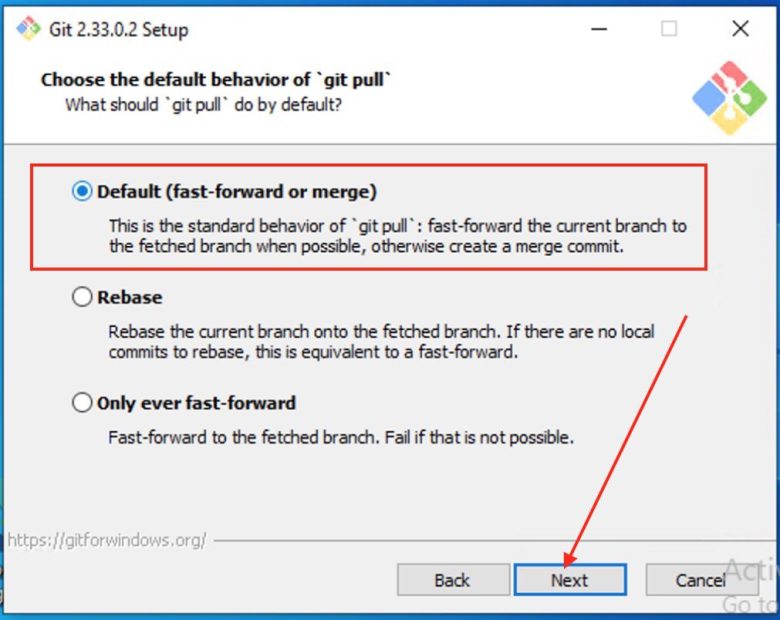
Moreover, The installer now asks what the command should do as described in the image below. In addition, The default option is recommended unless you specifically need to change its behavior. Click Next to continue with the installation.
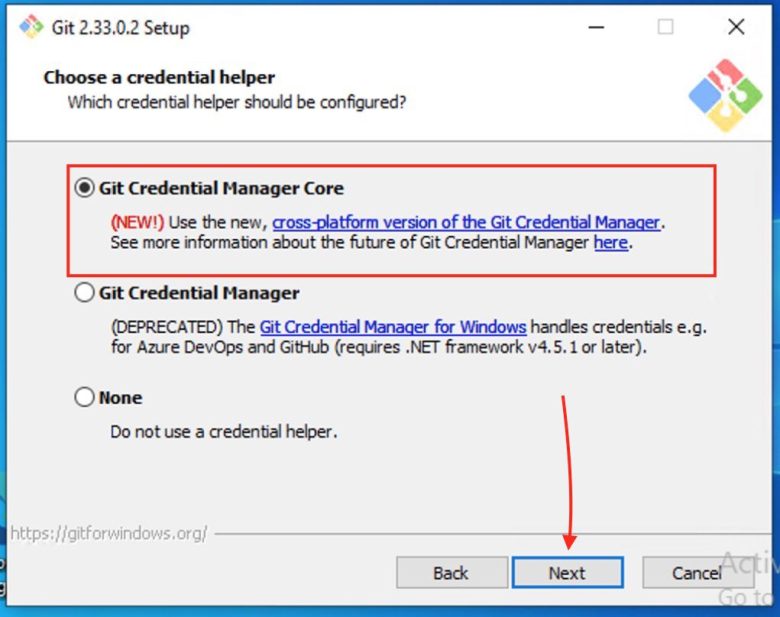
Please decide on which credential helper to use. Nonetheless, Git uses credential helpers to fetch or save credentials. Consequently, Leave the default option as it is the most stable one, and click Next.
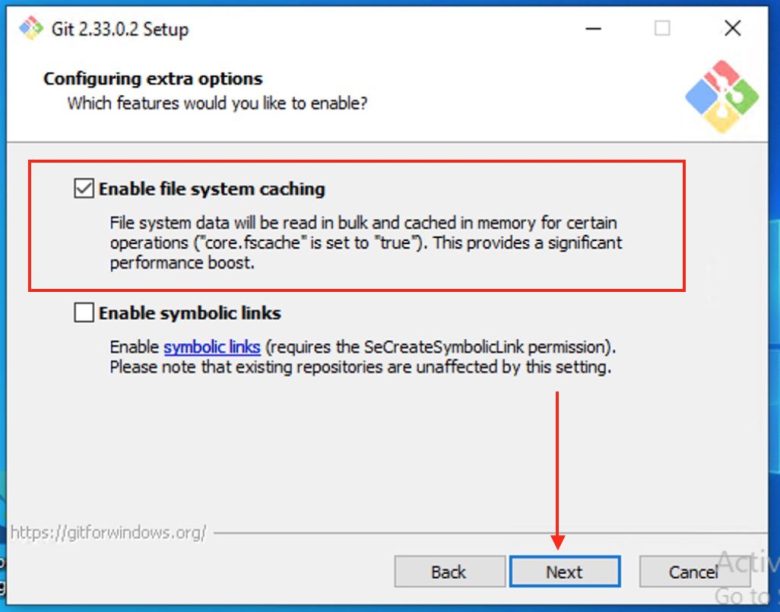
Similarly, The default options are recommended. However, this step allows you to decide which extra option you would like to enable. Nevertheless, If you use symbolic links, which are like shortcuts for the command line, tick the box. Click Next.
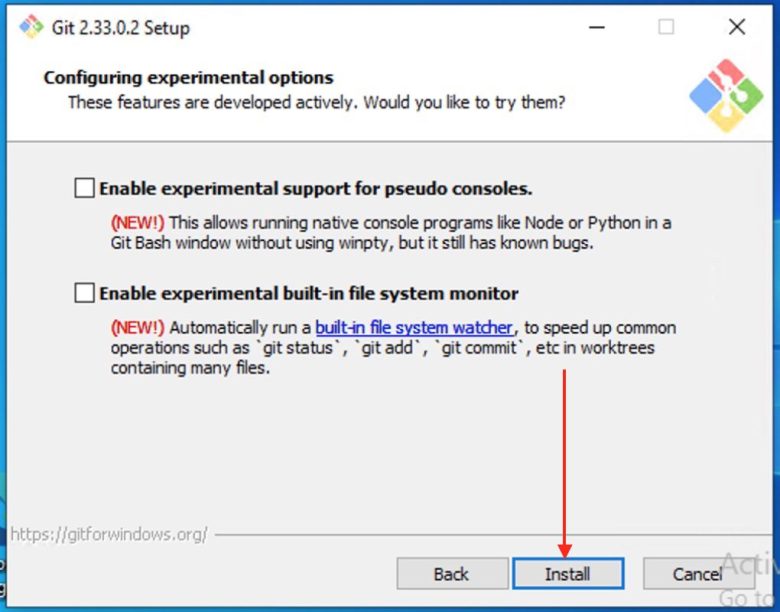
Therefore, Below are experimental options. I will leave them unchecked and then click on .
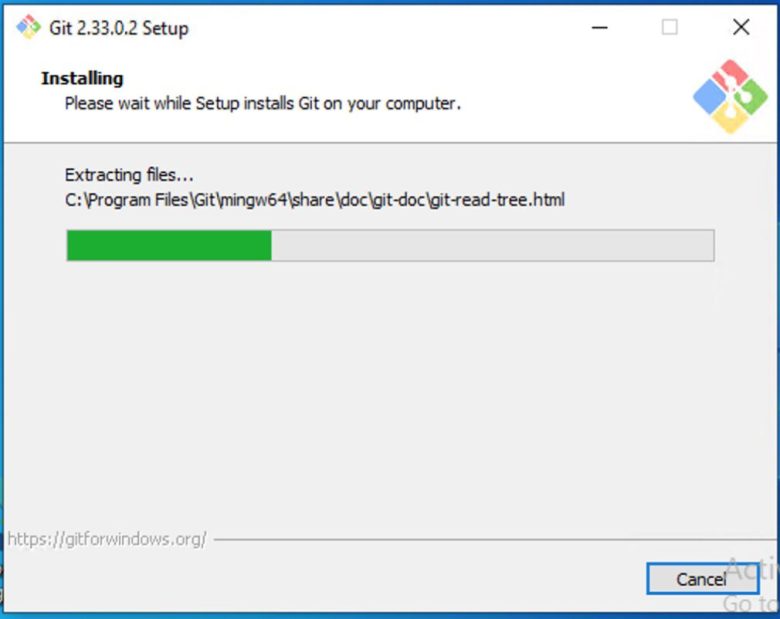
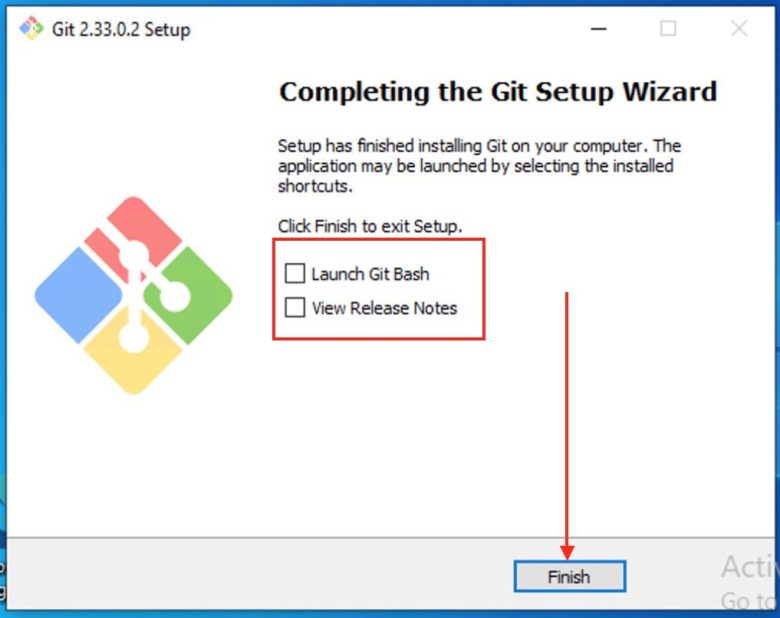
Additionally, As you can see below, Git is currently being installed and on the next window, the installation is completed.
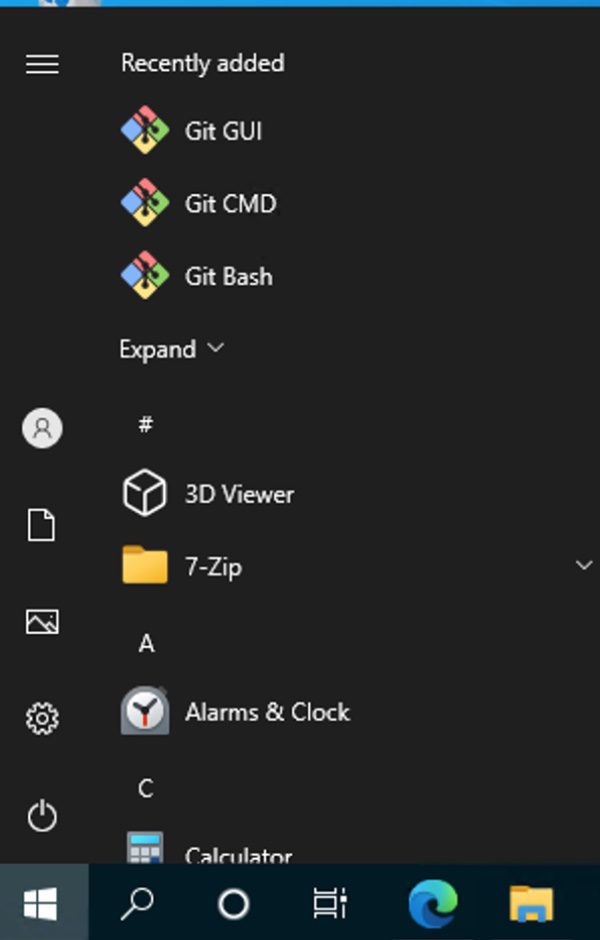
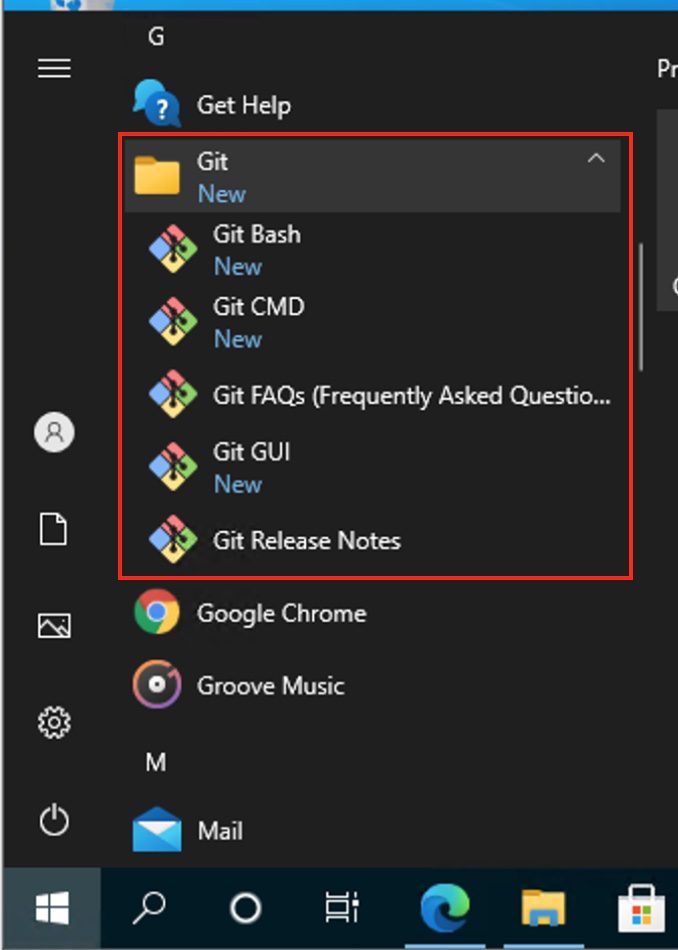
Furthermore, Git has various modes of use. Below are some of the ways to launch Git in your enviornment. To launch open the Windows Start menu, type , and press or click the application icon as shown in the image below.