
Troubleshooting Issues After a Linux Kernel Upgrade
Despite best efforts, some configurations can still experience issues after a Linux kernel upgrade like:
- Failure to boot successfully into the new kernel version
- System freezes or crashes when using the upgraded kernel
- Hardware components like network cards or drives that become inaccessible
- Graphical corruption or GPU drivers that bail out
Here are some troubleshooting steps to resolve post-upgrade kernel issues:
1. Select Previous Kernel at Boot
From the GRUB menu, choose the previous known good kernel version that was running before the upgrade. This can at least get you booting again.
2. Analyze System Logs
Check log files like for clues related to the failure. Error messages around drivers failing to load or hardware not being detected indicate compatibility issues.
3. Search Bug Trackers
Look for existing bug reports related to your hardware and kernel version. These provide insight into known issues and workarounds.
4. Try Upgrading Related Packages
In some cases, upgraded complementary packages like new GPU drivers, kernel modules, glibc, etc can resolve problems.
5. Roll Back the Kernel Upgrade
If all else fails, you can remove the problematic kernel. Then the new packages and reboot after.
With some targeted troubleshooting, you can resolve most issues that crop up after upgrading.
Now let‘s wrap up with some closing thoughts.
Параметры загрузки
Свободные драйвера, которые по умолчанию есть в Linux Mint, не очень хорошо работают с некоторыми видеокартами и материнскими платами.
Режим совместимости
Самый лёгкий способ — выбрать compatibility mode в меню загрузки с USB-носителя (или DVD).
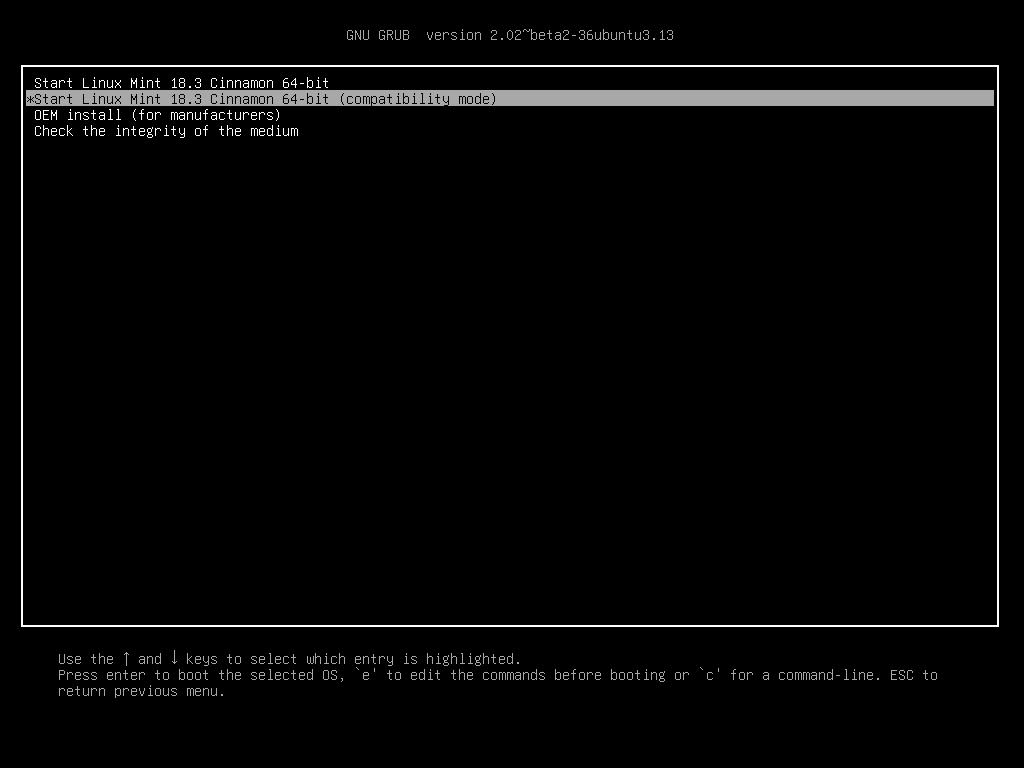
Меню Grub (режим EFI)
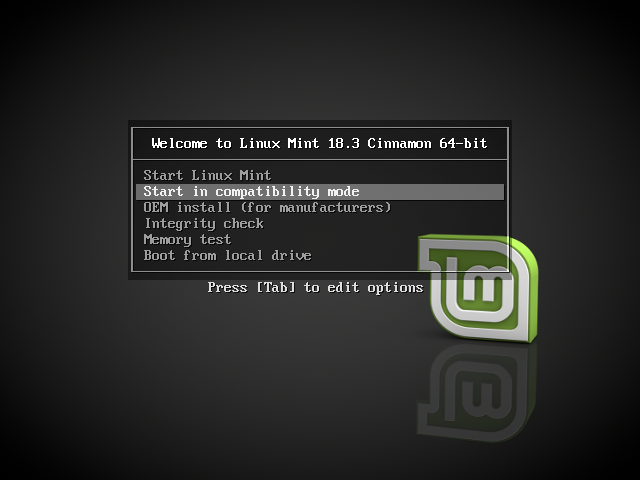
Меню Isolinux (режим BIOS)
Если это не работает, попробуйте использовать параметр загрузки nomodeset .
Параметр загрузки Nomodeset
В режиме EFI выберите Start Linux Mint и нажмите e для изменения параметров загрузки.
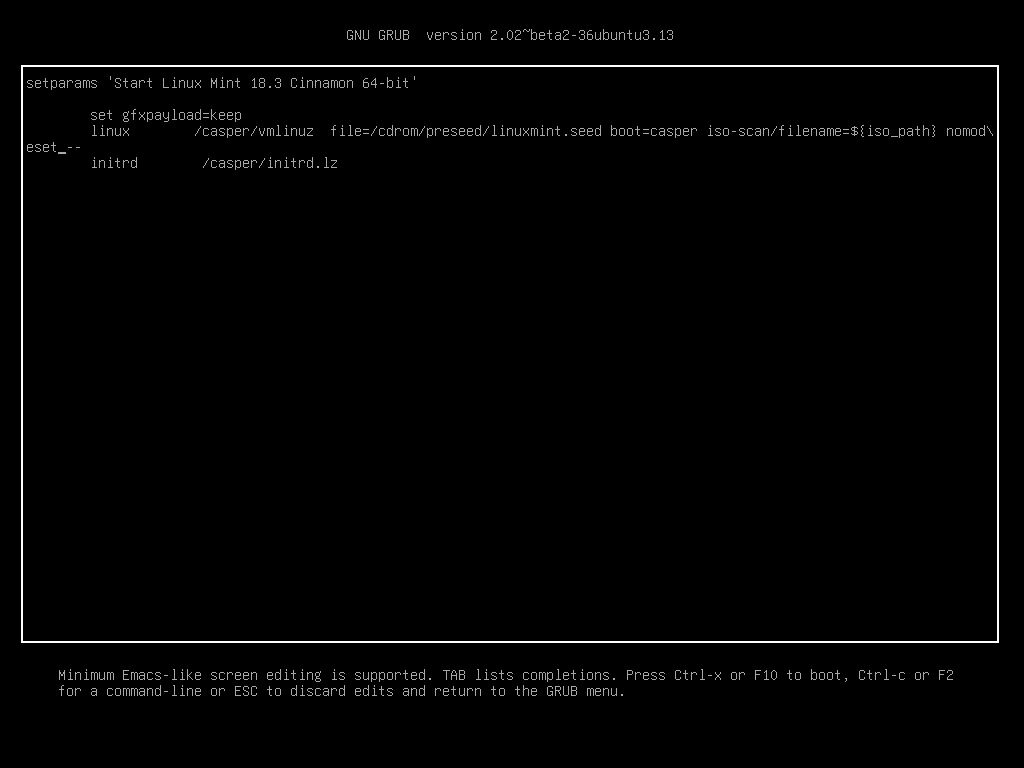
Измените quiet splash на nomodeset и нажмите F10 для загрузки.
В режиме BIOS выберите Start Linux Mint и нажмите Tab для изменения параметров загрузки.

Измените quiet splash на nomodeset и нажмите Enter для загрузки.
Повторите эту операцию в загрузочном меню grub после установки и ознакомьтесь с драйверы для установки дополнительных драйверов.
Другие параметры загрузки
Если система так и не загрузилась, попробуйте одно из следующих решений:
- Попробуйте nouveau.noaccel=1 вместо nomodeset .
- После установки выберите «Дополнительные параметры –> Режим восстановления» в меню загрузки и выберите «восстановить».
Установить старый выпуск
Если ваш компьютер имеет проблемы с совместимостью с последним выпуском Linux Mint, установите предыдущий выпуск из той же серии Linux Mint.
Например, если вы не можете установить Linux Mint 18.3 (который поставляется с ядром 4.10), установите Linux Mint 18 (который поставляется с ядром 4.4) и обновите до 18.3.
Первый выпуск в каждой серии использует ядро LTS (долгосрочная поддержка). Обновление до последней версии не изменяет ядро.
Copyright 2017, Linux Mint Revision d8fbd844 .
Built with Sphinx using a theme provided by Read the Docs.
Read the Docs v: latest
Versions latest Downloads pdf html epub On Read the Docs Project Home Builds Free document hosting provided by Read the Docs.
Цикл выпуска Linux Mint
Ubuntu выпускает LTS-версию каждые два года. Версия для Linux Mint выпускается вскоре после этого. Другими словами, вы получаете новую версию Mint каждые два года.
Так, Linux Mint 20 был выпущен в 2020 году на базе Ubuntu 20.04, Mint 21 — в 2022 году на базе Ubuntu 22.04.
В отличие от Ubuntu, для Mint нет строгого графика выпуска. Новая версия выпускается, когда разработчики считают ее готовой.
Точечные релизы
Между двумя (основными) выпусками версий Mint есть три точечных выпуска, которые выходят с интервалом в шесть месяцев.
Итак, Mint 20 (или 20.0) вышел в июне 20-го. Mint 20.1 вышел в декабре 2020 года, Mint 20.2 в июне 21 года и Mint 20.3 в декабре 21 года. После этого команда Mint работает над следующим крупным релизом.


Что есть в этих точечных релизах? Новая версия среды рабочего стола, содержащая в основном визуальные изменения пользовательского интерфейса. Иногда в нем также могут быть представлены новые приложения.
Обновление до точечного выпуска является необязательным. Вы можете остаться с 20.1 и не обновлять его до 20.2 и 20.3.
После последнего выпуска (XX.03) ваша система будет получать только обновления безопасности и обслуживания для установленного программного обеспечения. Вы не получите новых основных версий среды рабочего стола и некоторых других программ, таких как GIMP или LibreOffice.
Цикл поддержки
Не все дистрибутивы на основе Ubuntu дают вам такое же преимущество цикла обновления, как Ubuntu Canonical. Многие дистрибутивы на основе Ubuntu обеспечивают поддержку на срок до 3 лет.
К счастью, на Linux Mint вы получаете те же возможности обновления, что и для Ubuntu.
Каждый выпуск Linux Mint поддерживается в течение пяти лет. После этого необходимо выполнить обновление до следующей версии или установить более новую версию заново.
Например, Mint 20 был выпущен в 2020 году, через несколько месяцев после Ubuntu 20.04. Ubuntu 20.04 LTS поддерживается до 2025 года, поэтому серия Mint 20 также поддерживается до 2025 года.
Все точечные выпуски серии поддерживаются до одной и той же даты. Mint 20.1, 20.2 и 20.3 будут поддерживаться до 2025 года.
Точно так же Ubuntu 22.04 LTS будет поддерживаться до апреля 2027 года. Вы можете ожидать цикла обновления для серии Linux Mint 21 (на основе Ubuntu 22.04) до тех же временных рамок.
Обобщим:
- Вы получаете новую основную версию Linux Mint каждые два года.
- Каждая основная версия поддерживается в течение пяти лет.
- За каждым основным выпуском (версия XX) следуют три дополнительных выпуска (XX.1, XX.2, XX.3) перед следующим основным выпуском.
- Точечные выпуски (XX.1, XX.2, XX.3) поддерживаются до того же времени, что и их основная версия (XX).
Potential Compatibility Issues After a Kernel Upgrade
Because the kernel directly interacts with hardware and drivers, upgrading introduces a risk of breaking compatibility with some configurations:
- Custom or out-of-tree drivers may not compile or work properly on new kernel versions until they are updated by the vendor
- As support for ancient hardware is dropped, extremely old systems may have trouble with newer kernels
- Exotic setups like self-built kernels with tons of custom patches or tuning may become unstable
Reports of equipment/kernel compatibility issues are tracked in the Linux community. Some examples:
| Hardware | Kernel Version | Compatibility Issue |
|---|---|---|
| Raspberry Pi 4 | 5.10+ | Breaks WiFi |
| AMDGPU on Older Cards | 5.11+ | Fan control no longer works |
| Intel GMA500 GPU | 5.16+ | Graphics fail to initialize |
Before upgrading, consult resources like the Linux Hardware Database to check if your hardware has any known issues. Search Linux forums and bug trackers to identify problems reported by others as well.
Consider testing a new kernel from a Live CD or VM first before upgrading your production system. Backing up data and being ready to roll back by booting to an older kernel can prevent headaches.
Поддержка NVIDIA
Улучшена поддержка технологии NVIDIA Optimus. В системном лотке, при нажатии правой кнопкой мыши на апплет NVIDIA Prime, открывается меню, в котором можно выбрать активную видео-карту.
Выбор режима работы видео
Добавлена поддержка режима NVIDIA «On-Demand». В этом режиме в качестве основной используется карта Intel, а NVIDIA можно использовать при запуске конкретных приложений. Для этого нужно нажать правой кнопкой мыши по иконке приложения и выбрать пункт Run with NVIDIA GPU.
Запуск программы в режиме NVIDIA «On-Demand»
Добавлены две новые команды:
- nvidia-optimus-offload-glx
- nvidia-optimus-offload-vulkan
Для улучшения загрузки Linux Mint 20 в Live режиме без NVIDIA драйверов, добавлена опция «nomodeset» в режим «Compatibility Mode».
Во всех редакциях Linux Mint иконки в области уведомлений (XAppStatusIcon) полностью адаптированы под HiDPI экраны.
Добавлена поддержка обработки вращения колесика мыши.
Добавлена поддержка SNI (StatusNotifier, libIndicator).
Улучшена производительность файлового менеджера Nemo, который используется в редакции Cinnamon.
Основное изменение связано с тем, что теперь миниатюры файлов (значки предпросмотра) загружаются уже после того, как показан список файлов. Сначала для значков устанавливается иконка по умолчанию, и после того, как отобразится список файлов, начинается дозагрузка миниатюр. Это значительно повысило отзывчивость программы, и позволяет сразу начать работать с файлами, не дожидаясь полной загрузки списка со всеми миниатюрами.
Linux Mint Forums
Forum rules There are no such things as «stupid» questions. However if you think your question is a bit stupid, then this is the right place for you to post it. Stick to easy to-the-point questions that you feel people can answer fast. For long and complicated questions use the other forums in the support section. Before you post read how to get help. Topics in this forum are automatically closed 6 months after creation.
4 posts • Page 1 of 1
Boyce Level 1 Posts: 1 Joined: Mon Jun 14, 2021 3:40 am
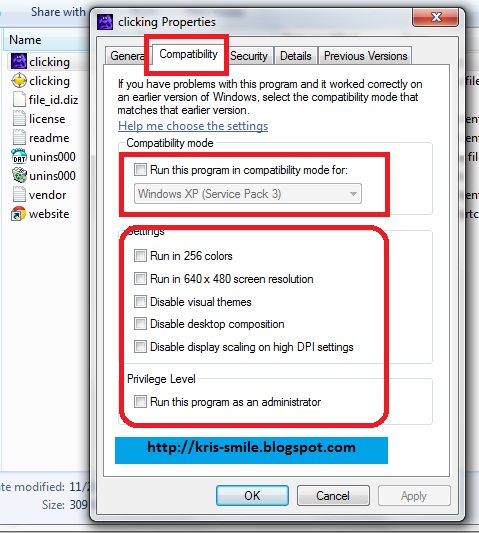
What exactly is Compatibility Mode?
Post by Boyce » Mon Jun 14, 2021 3:53 am
I am trying to use Mint 17.1 64bit On a Lenovo T61. I have issues with shut down or restart not working, and hardware not working. The hardware that doesn’t work is PCMCIA slots and the internal Qualcom Atheros wireless card.
The thing is, the system seems to work perfectly if I boot from a «Live» USB and select Compatibility mode. So I’m wondering what’s actually different about compatibility mode. I am very experienced with Microsoft Windows troubleshooting, but am very very new to Linux. I know Windows has «Safe Mode» where it will only load the essential components and drivers for the OS and a basic VGA driver for video. I thought Compatibility mode was similar but it seems different, I seem to have a decent video mode, and all the drivers I need for the system to function properly. So what is Compatibility mode? Is it 64bit? It’s tempting to just leave a usb «Live» flash drive in the system all the time and always boot into it. Is there a good way to see what the system is doing differently in Compatibility mode compared to normal so I can use that info to fix normal mode? Thanks in advance for any assistance.
Last edited by LockBot on Wed Dec 28, 2022 7:16 am, edited 1 time in total. Reason: Topic automatically closed 6 months after creation. New replies are no longer allowed.
Pjotr Level 23 Posts: 19575 Joined: Mon Mar 07, 2011 10:18 am Location: The Netherlands (Holland) Contact:
Преимущества использования режима совместимости Start Linux Mint
- Поддержка множества программ и приложений: режим совместимости Start Linux Mint позволяет использовать большое количество программ и приложений, разработанных для других операционных систем, в том числе Windows. Это исключительно удобно для пользователей, которые переходят на Linux Mint с других платформ.
- Простота установки: для того чтобы воспользоваться режимом совместимости Start Linux Mint, нет необходимости устанавливать и настраивать дополнительное программное обеспечение. Система имеет встроенные инструменты, которые обеспечивают совместимость с программами и приложениями, что значительно упрощает процесс.
- Удобство использования: благодаря режиму совместимости, пользователи могут продолжать пользоваться привычными программами и приложениями, не переживая о несовместимости с новой операционной системой. Это позволяет сохранить привычный рабочий процесс и повышает продуктивность.
- Экономия времени и денег: использование режима совместимости позволяет избежать необходимости искать и устанавливать аналоги программ и приложений, которые были использованы на предыдущей платформе. Это экономит время и деньги пользователей, так как они могут сразу же начать работать с необходимыми программами и приложениями.
- Кросс-платформенность: режим совместимости Start Linux Mint позволяет использовать программы и приложения, разработанные для различных операционных систем, в том числе Windows и MacOS. Это особенно полезно для тех, кто работает в смешанной среде или нуждается в доступе к программам, не поддерживаемым нативно в Linux Mint.
В целом, режим совместимости Start Linux Mint предоставляет пользователям возможность использовать широкий спектр программ и приложений без необходимости переходить на другую операционную систему
Это делает работу в Linux Mint более удобной и эффективной, что особенно важно для тех, кто переходит на эту платформу с других платформ. Режим совместимости позволяет сохранить привычный рабочий процесс, экономит время и деньги, а также обеспечивает кросс-платформенную совместимость
An Introduction to the Linux Kernel
Before jumping into kernel upgrades, let‘s do a quick overview of what the Linux kernel actually is and does.
The kernel is the central component of any Linux OS, providing core functionality and hardware interfaces for all other software on the system. It manages vital resources like CPU time, memory, disk I/O, and network usage to ensure smooth operation.
Some key functions include:
- Process scheduling – Optimally shares CPU time across running processes and threads. Uses «completely fair scheduling» in modern versions.
- Memory management – Handles allocation of memory pages to processes and caching in RAM or swap space. Uses demand paging to improve efficiency.
- I/O and file systems – Supports access to disks, networks, peripherals. Implements file systems like ext4, XFS, Btrfs, and more.
- Drivers – Interacts with hardware like video cards, wifi chips, storage controllers. Each kernel release adds support for more devices.
- Security frameworks– Implements access controls like SELinux and AppArmor to tighten security on sensitive systems.
The kernel also decides when to invoke processes, handles interrupts for hardware events, and provides system calls for user space programs to communicate with kernel space.
Upgrading to newer kernel releases brings improved versions of these subsystems and components. Now let‘s look at why you may want to upgrade.


«Errors were encountered while processing: fglrx-amdcccle» (on 64-bit systems)
Most likely, you probably did not have the ia32-libs-multiarch:i386 lib32gcc1 libc6-i386 packages installed beforehand. If you have a 64 bit install, the above dpkg command may complain that «Errors were encountered while processing: fglrx-amdcccle». This is because of a dependency of the amdccle package on 32 bit libraries. If you receive this error, use the following command, which will force the installation of all of the 32 bit dependencies, and then the amdcccle package:
sudo apt install -f
Catalyst 15.12 on 64-bit systems may require the —force-overwrite command in the above dpkg command:
sudo dpkg -i --force-overwrite fglrx*.deb
Hybrid Graphics and Catalyst
There are two basic types of hybrid designs. Older hybrid systems use a multiplexor (mux) to switch between GPU’s. Newer systems (those with PowerXpress >= 4.0) are muxless. As far as I can tell, PowerXpress 4.0 started with RadeonHD 6000-series GPU’s, and systems with older ATI GPU’s have a mux, but don’t quote that.
ATI/ATI Hybrids
As of Catalyst 11-8, switching between two ATI cards (and maybe Intel/ATI muxless too?) is supposed to be doable, though it’s not clear if that applies to all ATI/ATI hybrids or only the muxless ones. One would use amdconfig’s PowerXpress options to switch back and forth between the integrated and discrete cards, like so:
amdconfig --pxl            # List current activated GPU
sudo amdconfig --px-dgpu   # Activate discrete GPU (High-Performance mode), must re-start X to take effect
sudo amdconfig --px-igpu   # Activate integrated GPU (Power-Saving mode), must re-start X to take effect
After switching, one would log out and back in to restart X.
Intel/ATI Hybrids
- An incompatibility problem between intel and fglrx drivers (This gives segmentation fault at X server)
- An incompatibility problem between intel and fglrx drivers that gives an error related to allocation of resources in Xorg log file.
- Some paths missing for openGL operation of the fglrx driver (This prevents applications that require direct rendering, e.g. Unity/games/etc, from loading correctly)
A workaround for now is to use the discrete GPU (ATI)
Unsupported Hardware Watermark
This can happen if your card’s PCI ID wasn’t officially certified to work with a particular version of Catalyst. It does not necessarily mean that your card is unsupported, but it does mean that you shouldn’t file bugs with that particular card/driver combination. If you installed the driver by downloading it from AMD/ATI, installing a newer version of Catalyst will probably help.
If you installed the proprietary driver included with Ubuntu or you do not want to upgrade to a newer version, it is possible to work around the issue. First check if AMD’s signature file has a proper signature:
sudo nano /etc/ati/signature
If the file only contains the word UNSIGNED, replace the line with:
9777c589791007f4aeef06c922ad54a2:ae59f5b9572136d99fdd36f0109d358fa643f2bd4a2644d9efbb4fe91a9f6590a145:f612f0b01f2565cd9bd834f8119b309bae11a1ed4a2661c49fdf3fad11986cc4f641f1ba1f2265909a8e34ff1699309bf211a7eb4d7662cd9f8e3faf14986d92f646f1bc
Reboot and see if the watermark is gone. If not, try using a control file from a older version of Catalyst than the one you’re running:
Перевод Linux Mint в режим совместимости с Windows
Linux Mint — один из самых популярных вариантов операционной системы Linux. В нем есть специальный режим совместимости с Windows, который позволяет пользователю с легкостью перейти с операционной системы Windows на Linux Mint. Режим совместимости упрощает процесс адаптации и обеспечивает знакомый интерфейс, который пользователи Windows уже привыкли видеть.
Режим совместимости с Windows предлагает следующие функции и настройки:
- Менеджер окон Cinnamon: Cinnamon является стандартным менеджером окон в Linux Mint и предлагает интерфейс, схожий с интерфейсом Windows. К нему можно привыкнуть быстро и легко.
- Тема оформления: Linux Mint в режиме совместимости предлагает несколько тем оформления, которые похожи на темы Windows. Это позволяет сохранить знакомый и комфортный интерфейс.
- Меню «Пуск»: Linux Mint имеет меню «Пуск», которое похоже на меню «Пуск» в Windows. В нем можно легко и быстро найти нужные приложения, настройки и файлы.
- Поддержка оболочки Windows: Linux Mint включает поддержку оболочки Wine, которая позволяет запускать приложения, разработанные для Windows. Это может быть полезно, если вам нужно использовать специфические программы, доступные только на Windows.
- Интеграция с облачными сервисами: Linux Mint умеет работать с популярными облачными сервисами, такими как Dropbox и Google Drive. Это позволяет удобно работать с файлами и документами из операционной системы Linux.
Чтобы включить режим совместимости с Windows в Linux Mint, вам потребуется:
- Зайти в системные настройки.
- Выбрать «Параметры внешнего вида».
- В разделе «Тема оформления» выбрать тему, наиболее похожую на интерфейс Windows.
- В разделе «Менеджер окон» выбрать Cinnamon.
- Перезапустить систему для применения изменений.
После перезагрузки Linux Mint будет работать в режиме совместимости с Windows и предложит вам знакомый и удобный интерфейс для работы.
Linux Mint в режиме совместимости с Windows — отличное решение для новичков, которые только переходят на Linux, а также для пользователей, привыкших к интерфейсу Windows и хотят сохранить привычность в новой операционной системе. Попробуйте режим совместимости в Linux Mint и наслаждайтесь комфортной работой на своем компьютере!
Test your installation
NOTE: if you don’t reboot first, fglrxinfo gives an error message.
Reboot the computer and type
fglrxinfo
into the terminal. If the vendor string contains AMD, you have installed the driver successfully. Using fglrxinfo on a system with Catalyst 12-3 and a RadeonHD 4550 returns:
display: :0.0  screen: 0
OpenGL vendor string: Advanced Micro Devices, Inc.
OpenGL renderer string: AMD Radeon HD 6670  --  (This line may be different depending on what graphics card you are using!)
OpenGL version string: 4.3.12798 Compatibility Profile Context 13.35.1005  --  (This line may be different depending on what graphics card and Catalyst version you are using!)
Now, try:
fgl_glxgears
If you experience issues or a hang, you may need to disable fast TLS.
sudo amdconfig --tls=0
Just in case
Write down or remember this series of Alt+PrntScr key combinations, just in case your screen should go black and Ctrl+Alt+F1 and Ctrl+Alt+Backspace doesn’t work.
Alt+PrntScr+r, Alt+PrntScr+s, Alt+PrntScr+e, Alt+PrntScr+i, Alt+PrntScr+n, Alt+PrntScr+u, Alt+PrntScr+b
These key-presses will reboot the system safely. To remember the key-presses, remember this nonsensical phrase: «Raising Skinny Elephants Is Never Utterly Boring».
An alternative would be to hold down Ctrl+Alt+SysRq (SysRq is usually the same key as PrintScreen) and type very slowly R E I S U B. A way to remember this is by inverting the word: «BUSIER» or remembering a phrase: «Restart Even If System Utterly Broken». This would also safely shutdown the system.
Strategies for Safely Testing Upgraded Kernels
Since compatibility problems can sneak through even with extensive testing by kernel devs, it‘s wise to validate an upgraded kernel in an isolated environment before deploying on business critical systems:
Virtual Machines
Spin up a VM using solutions like KVM, VirtualBox, or VMware Workstation. Take snapshots before upgrading. This lets you rapidly restore to a known good state if issues emerge.
Live CDs
Boot your physical hardware using a Live Linux environment like Mint Live. Test functionality of your hardware components to uncover any incompatibilities.
chroot Jails
Install the new kernel, then into a directory with your current root filesystem. This lets you safely evaluate the upgrade in the context of your unique config and data.
Evaluate which strategy fits your environment and risk tolerance. Isolating kernel upgrades can prevent headaches.
Now let‘s move on to troubleshooting just in case problems do happen post-upgrade.
Poor battery life (atieventsd not starting and/or not authenticating)
The Sys-V-init script, `/etc/init.d/atieventsd` thinks the symlink is elsewhere, namely `/usr/sbin/atieventsd` (i.e. `sbin` not where it actually is, `bin`)
So to launch successfully the `atieventsd` on startup I had to do make the change:
DAEMONPATH=/usr/bin/atieventsd
Then remove/regenerate the run levels:
   cd /etc/init.d
   mv atieventsd atieventsd.temp
   update-rc.d atieventsd remove
   mv atieventsd.temp atieventsd
   update-rc.d atieventsd defaults
This should now at least allow the daemon to correctly start/stop. You can test with `service atieventsd start`.
On each startup the daemon attempts to launch a script, `/etc/ati/authatieventsd.sh` (by default) , whose purpose is to grant the `atieventsd daemon` authorization access to the X server display, so it can send it various commands.
This script is called by `atieventd` like (see `ps aux | grep atieventsd` after starting the service or booting)
/etc/ati/authatieventsd.sh grant :0 /tmp/atieventsdGWt098
The problem is that if you look at the `/etc/ati/authatieventsd.sh` script you will see it does not support `lightdm`, you need to add the chunk of code inside the `GetServerAuthFile()` function:
   #Check lightdm
    LIGHTDM_AUTH_FILE=/var/run/lightdm/root/$1
    if ; then
        SERVER_AUTH_FILE=$LIGHTDM_AUTH_FILE
        DISP_SEARCH_STRING="unix$1"
        return 0
    fi
to allow it find the correct server authentication file. Save this and you should
see a file in the `/tmp` directory of the form `atieventsdGWt098`, the next time the `atieventd` is stopped/start (or next reboot), and if you do
xauth -f /tmp/atievntX.Dh1AJV list
you should get something like
yourHostname/unix:0 MIT-MAGIC-COOKIE-1 98deg034234kkn34234mmm3242
Showing that the daemon has indeed been granted authority.
You can also look at syslog, if you add the `—debug` option to `/etc/init.d/atieventsd` init file DAEMONOPTS options (regen run levels), and you should see everything is now working correctly, and the daemon is responding to events such as unplugging the AC and lid closes. For example:


   <Dbg>: ACPI event: ac_adapter AC 00000080 00000000
   <Dbg>: ACPI event: processor CPU0 00000081 00000000
   processor CPU1 00000081 00000000
   processor CPU2 00000081 00000000
   processor CPU3 00000081 00000000
Maybe this will help extend battery life.
Using VDPAU (EXPERIMENTAL)
Requires the latest open source driver provided by Oibaf in his PPA.
sudo add-apt-repository ppa:oibaf/graphics-drivers
sudo apt update
sudo apt upgrade
Reboot your system and proceed by installing the VDPAU driver.
sudo apt install mesa-vdpau-drivers
You can test the VDPAU driver by using mplayer.
mplayer -vo vdpau -vc ffmpeg12vdpau yourvideofile
Flash Hardware Video Decode Acceleration
This only applies to Firefox and other NPAPI-compatible web browsers not Pepper Flash included in Chrome.
Adobe Flash doesn’t use hardware acceleration by default on Linux so we’ll have to force it.
sudo mkdir /etc/adobe
sudo echo -e "EnableLinuxHWVideoDecode =1\nOverrideGPUValidation =1" | sudo tee /etc/adobe/mms.cfg
Restart Firefox.
You can check if acceleration is working by right clicking a Flash video on YouTube and selecting «Stats for nerds». The stats box that shows up should display the following: «accelerated video rendering, accelerated video decoding»
Revert to original drivers
To revert to standard Ubuntu drivers
sudo apt install ppa-purge
sudo ppa-purge ppa:oibaf/graphics-drivers
Updating Catalyst/fglrx
DO NOT TRY INSTALLING A NEWER FGLRX OVER AN OLDER ONE!!!. Follow the ‘Removing Catalyst/fglrx’ section below to remove your existing driver, and then you can start at ‘Downloading the latest Catalyst’ to install the new one.
Removing Catalyst/fglrx
The uninstall script in the first command will only exist if you downloaded the drivers and installed them directly (rather than building packages as this guide does).
sudo apt remove --purge fglrx*
IMPORTANT!
sudo apt remove --purge xserver-xorg-video-ati xserver-xorg-video-radeon
sudo apt install xserver-xorg-video-ati
sudo apt install --reinstall libgl1-mesa-glx libgl1-mesa-dri xserver-xorg-core
sudo mv /etc/X11/xorg.conf /etc/X11/xorg.conf.backup
sudo rm -rf /etc/ati
If you receive
$ E: Internal Error, No file name for libgl1-mesa-dri
Change the third command above to:
sudo apt install --reinstall libgl1-mesa-glx:i386 libgl1-mesa-glx:amd64 libgl1-mesa-dri:i386 libgl1-mesa-dri:amd64 xserver-xorg-core
Какие программы и приложения совместимы с Linux Mint?
Linux Mint обеспечивает поддержку огромного количества программ и приложений, что делает его полноценной альтернативой другим операционным системам. Вот несколько примеров популярных программ, которые работают на Linux Mint:
| Категория | Примеры программ и приложений |
|---|---|
| Офисные приложения | LibreOffice, Calligra Suite, WPS Office |
| Интернет и связь | Google Chrome, Mozilla Firefox, Thunderbird, Skype |
| Мультимедиа и развлечения | VLC Media Player, Audacious, Brasero, Banshee |
| Графика и дизайн | GIMP, Inkscape, Krita |
| Игры | Steam, PlayOnLinux, Wine |
| Разработка и программирование | Atom, Eclipse, Visual Studio Code, Python, Java |
Это только небольшая часть программ и приложений, которые совместимы с Linux Mint. Linux Mint также имеет свой собственный магазин приложений, где вы можете найти и установить еще больше программ, от игр до дополнительных инструментов для работы.
Если у вас есть программа, которую вы хотите использовать на Linux Mint, вы всегда можете проверить ее совместимость с помощью интернет-ресурсов и сообщества Linux Mint.