
TWRP Recovery: пошаговое руководство по прошивке смартфона
Для этого загрузите в память устройства архив с расширением ZIP для соответствующего смартфона. Процесс установки прост, не занимает более 30 минут. Практически такой же, как в предыдущей инструкции.
Пошаговое руководство:
- Подготовьте архив с официальной или неофициальной прошивкой. Внимательно прочтите название модели гаджета, потому что после установки несоответствующего ПО девайс не будет работать.
- Загрузите и поставьте на гаджет TWRP. Выключите устройство. Зайдите в рекавери. Делается это также, как и в предыдущей инструкции.
- Сбросьте до заводских настроек (пункт «Wipe»).
- В основном лобби выберите «Install». Найдите архив с программным обеспечением. Выберите прошивку. Утилита выполнит все сама. Длится процесс до 5 минут.
- В главном меню выберите «Reboot System». Устройство перезапустится.
Advanced ADB Usage Tips
It would be a waste of time for both of us to cover every usage and command of the ADB in this article.
In case there is any confusion, using the ADB to install APKs and do many of the things which Android Studio and Gradle do for you is not something that I would recommend (unless you have a good reason to do so).
With that being said, there are plenty of things that the ADB can do which are either difficult or impossible to do without it.
In the preliminaries section, I mentioned that the ADB can be used to get a hook to the shell of the device. To finish this article off, we will look at how to use shell commands and where to find more information about them.
If you do not know what a shell is, you probably skipped the section above where I explained that.
How to Use the ABD Shell
Sending a command to the device’s shell using the ADB is fairly simple. Remember that if you have multiple devices connected, follow it with to direct the command to a specific device.
To make a single shell command, we must use the command (big surprise, eh?), followed by the actual command we want to make on the device’s shell:
Output:
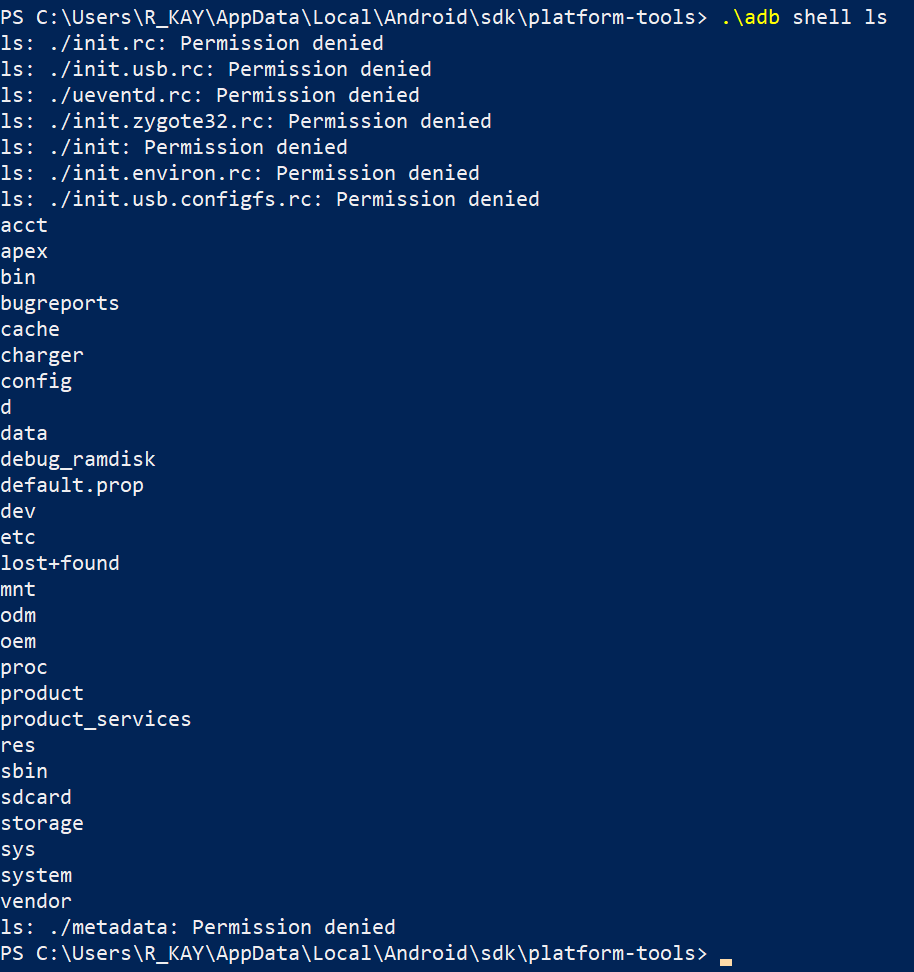
As mentioned previously, the command displays a list of files and directories at the CLI’s current directory. This happens to be the Android device’s root directory until we move to a different one.
If you plan to be making many commands via the Shell, you can also start an interactive Shell session. This can be done via the simple command:
While in an interactive Shell session, you can type Shell commands directly without further use of .
Note that when you want to quit the interactive Shell session, you can do so by typing or hitting Ctrl + D.

There are a variety of different commands and utilities you can work with via the Shell. The ActivityManager () of an Android device can be particularly useful for testing different components (Activities, Services, BroadcastReceivers, to name a few) of an Android app under different circumstances.
Suppose we want to launch straight into a particular Activity, but this Activity is not designated as the launcher Activity in the manifest.
You will still need to add the attribute to each entry in the manifest which you want to launch (assuming it is not already the launcher Activity).
After that you can use the following command to go straight to it:
Note that the must include whichever packages, relative to the package-id, within which it is located. See the output below for an example of launching an Activity which sits within several packages.

Further Reading
My goal in this article was to do my best to introduce, explain, and guide you through the usage of the ABD in my own words (insofar as that is possible).
At this point I would need to start making some very contrived examples or to simply carbon copy the documentation, neither of which are things that I am interested in doing.
Instead, I would like to encourage you to visit the , and to have a brief look at some of the cool things you can do using tools like the Activity Manager, Package Manager, Policy Manager, and others.
Send File to Your Device
There are plenty of applications dedicated to helping you transfer files between your computer and your Android device, such as OpenMTP. However, if you just want to transfer the occasional file, then downloading an entire application may feel like overkill.
The command lets you send files to your Android device. You just need to specify the source location of the file and the destination where you want to send that file:
adb push Source Destination
For example, you may have a file called “myapplication.apk” that’s stored on your Desktop that you want to push to your smartphone’s “downloads” folder. In this scenario, your ADB command may look something like this:
adb push UsersseconDesktopmyapplication.apk sdcarddownloads
The file will now be pushed from your laptop or computer and into the “Downloads” folder of the attached smartphone or tablet.
Also read: How to Sign Out of Google on Mobile and Desktop
Simulating System Activities
Many system activities can be simulated directly through adb shell commands. Often, it turns out very helpful in terms of automating the system testing process. For example, we can capture a screen shot and attach it with the bug report as follows.
adb shell screencap /sdcard/DCIM/Camera/mydevice.png
Furthermore, we can utilize the activity manager to instantiate activities to behave as if users are manually performing the tasks, such as making a phone call.
adb shell am start -a android.intent.action.CALL
                   -d tel:+<phone_number>
Similarly, to simulate the delivery of a text message and key strokes, here are the ADB commands issued in a sequence on my Google Nexus 5. Key event 22 is Android’s KeyEvent.KEYCODE_DPAD_RIGHT and 66 is KeyEvent.KEYCODE_ENTER. On my device, event 66 needs to be issued twice for two consecutive device screens.
adb shell am start  -a android.intent.action.SENDTO
                    -d sms:CC:+<phone_number>
                   --es sms_body ":+<message_body>"
                   --ez exit_on_sent true
adb shell input keyevent 22
adb shell input keyevent 66
adb shell input keyevent 66
Logs and Reports
One of ADB’s most powerful features is allowing you to monitor the system events in real time through adb logcat. Before we use that option, we can start by cleaning up whatever is already in the logs with adb logcat -c. To direct the logs onto a file, you can do logcat -d > mylogs.txt. In Figure 4, the example captures the real time logs on standard output and pipes them to Microsoft Windows findstr with the filter string “google”; in other words, only displaying lines containing this substring.
To save the bug report onto a user file titled myreports.txt, you do the following.
adb bugreport > c:tempmyreports.txt
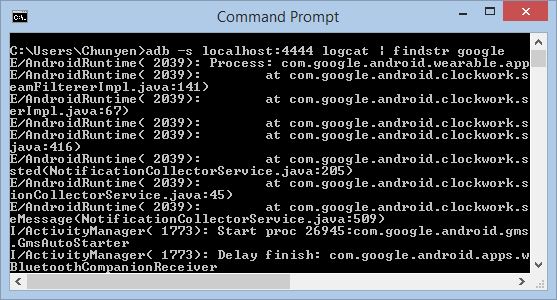
Figure 4:
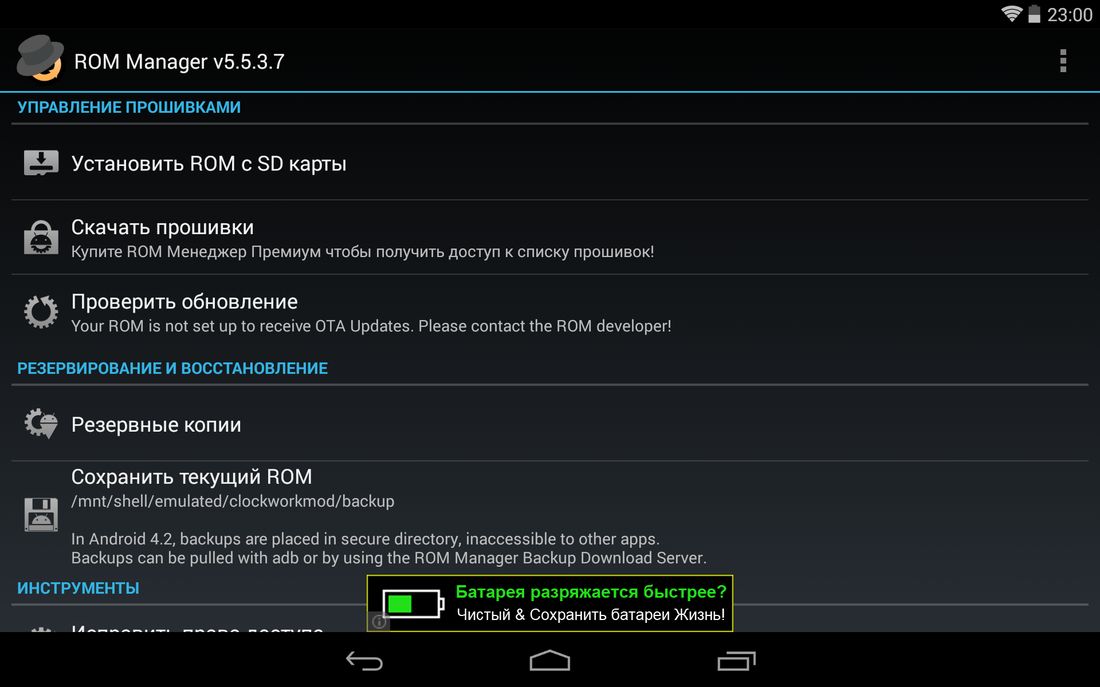
ROM Manager: подробная инструкция по перепрошивке Андроид устройства
Этот менеджер распространен из-за своей функциональности. Кроме прошивки, с его помощью можно создать копию системы. Это нужно для того, чтобы в случае неудачной установки, было возможно восстановить ОС и не потерять все данные. Перед началом прошивки воспользуйтесь этой функцией.
Единственный недостаток утилиты в том, что для работы с ней нужно получить рут права. Это позволит программе получить более широкий доступ к системным файлам и кодам. Легко получить Root можно с помощью приложения «Kingroot».
Пошаговая инструкция:
- Подготовьте ZIP-архив, переместив его в память девайса.
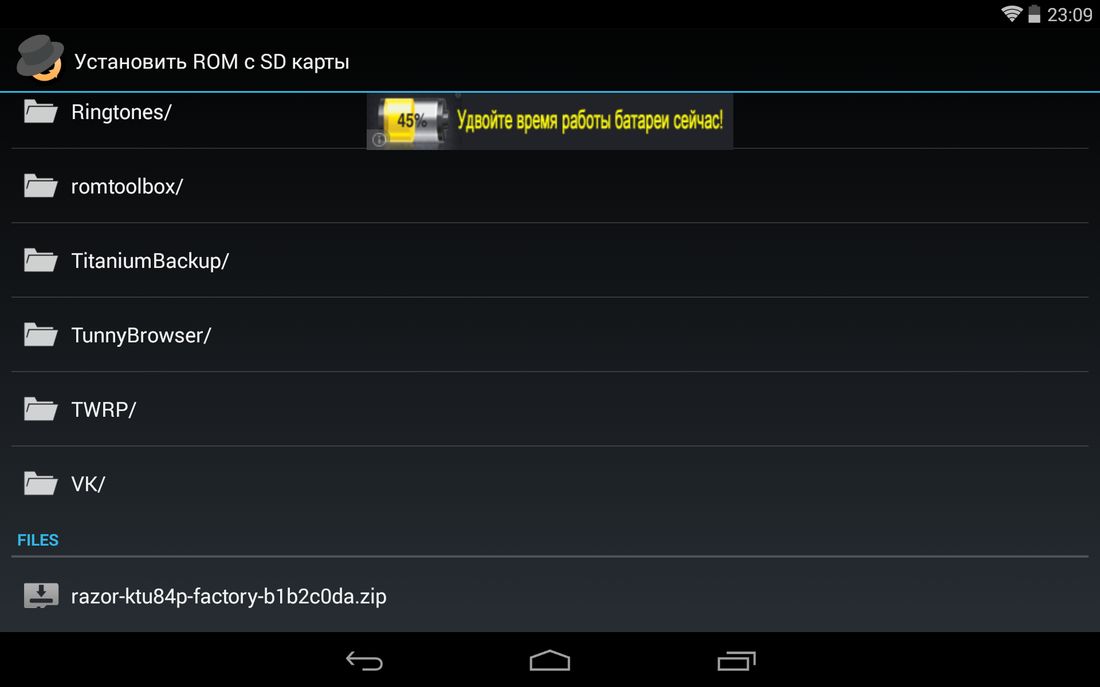
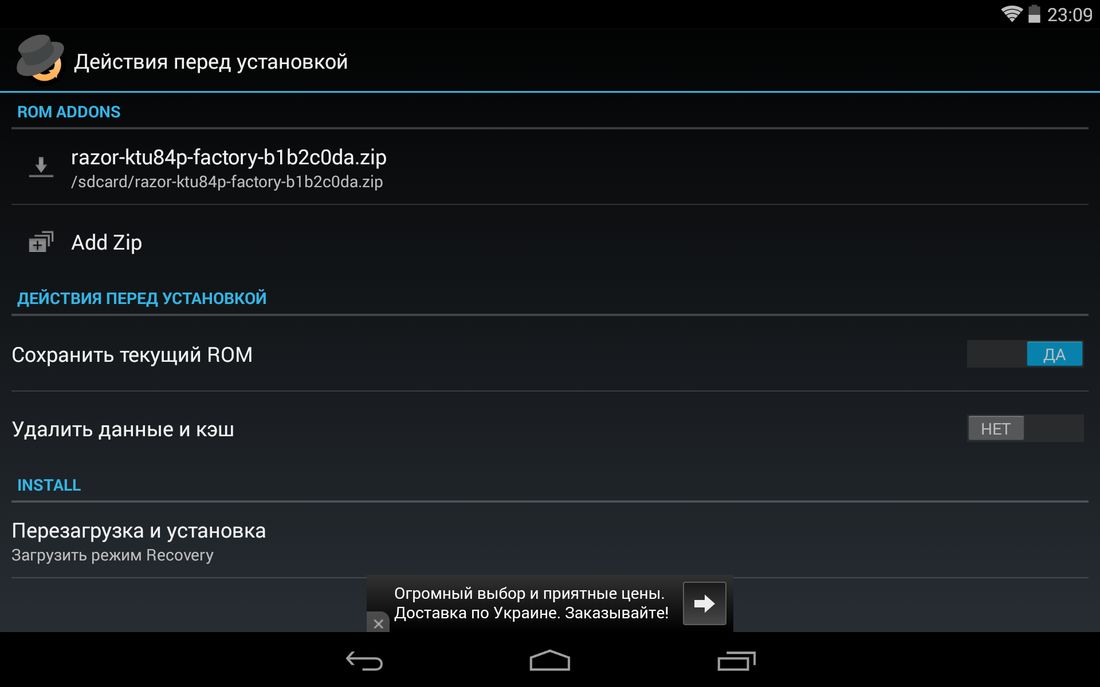
- Запустите ROM Manager. Нажмите на опцию «Install ROM from SD card».
- Выберите в проводнике архив.
- Нажмите на пункт «Reboot & Install». Обязательно поставьте флажок на опции «Save current ROM».
- Подтвердите выбор. Установка начнется.
Что значит Apply update from ADB
Android Debug Bridge – это мощная программа командной строки, позволяющая пользователям обмениваться данными с гаджетом, например, с телефоном Android. Команда активизирует различные действия девайса, такие как установка приложений или их отладка. Это клиент-серверная программа, которая включает в себя три компонента:
- Клиент, который отправляет команды. Клиент работает на ПК. Можно вызвать клиента из терминала командной строки, выполнив команду ADB.
- Приложение, которое запускает команды на девайсе. Оно запускается как фоновый процесс на каждом гаджете.
- Сервер, который управляет связью между клиентом и гаджетом. Сервер работает как фоновый процесс на ПК.
Чтобы использовать опцию Apply update from ADB, в качестве программы на свой компьютер вы должны сначала загрузить Android Debug Bridge.
Что такое ADB Sideload
Apply update from ADB, или «Sideload» – это технический термин, похожий на команду «upload/download». Однако он обычно относится к процессу передачи данных между мобильным телефоном и компьютером. Как уже упоминалось выше, это программа, и вам нужно будет «загрузить её» с ПК на телефон Android, чтобы завершить процесс обновления. По сравнению с другими способами такого подхода Sideload имеет несколько преимуществ:
- Нет платы за беспроводную передачу данных.
- Контент может быть оптимизирован для каждого мобильного устройства.
- Отсутствуют географические ограничения и покрытие сети.
- Содержимое не передаётся в сеть и может быть сохранено на мобильном устройстве.
Способ №3. Установить приложения Android С неизвестных источников
В Android в отличие от IOS существует официальная возможность установки приложений не с магазина Google Play, то есть вы можете устанавливать приложений с различных торрент и сайтов файлообменников. Будьте внимательны, так как вместо полезного приложения можете скачать вирус на свой Android планшет или смартфон!
Для того чтобы устанавливать приложения неизвестных источников:
Перейдите в настройки и активируйте данную возможность поставив галочку на пункте «Неизвестные Источники»
Видео пример как включить «Неизвестные Источники» в Android:
- Скачайте приложение на Android;
- Найдите его в файловом менеджере;
- Установите приложение;
What and Where is Android Debug Bridge (ADB)?
Android Debug Bridge (ADB) is a very powerful command-line utility you can use to communicate with Android-enabled devices or emulators. It is implemented in the server-client fashion and allows you to directly operate from the system level through shell commands on handheld devices. The executable of ADB, adb.exe, can be found under Android SDK’s child folder, platform-tools/. For example, in my case, it is under C:UsersChunyenAppDataLocalAndroidsdkplatform-tools. I recommend you add your folder path to the evironment variable.
Figure 1 shows the Android Studio integration, which you can see under Tools -> Android -> Enable ADB Integration. This should be enabled as a default. Once you have a connected device, you can see the device name in the drop-down menu and device’s system messages under logcat. Figure 2 shows the related settings on a mobile device. To do debugging through USB connection, this is a required step.
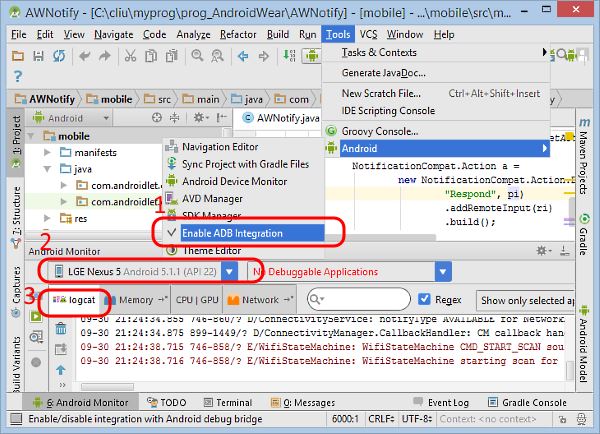
Figure 1:
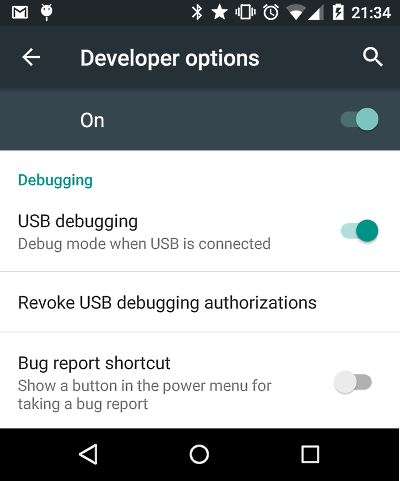
Figure 2:
Use flash lock states
The system API transmits the bootloader
state and the system
API returns the bootloader’s lock status on compliant devices.
| Return value | Conditions |
|---|---|
| Returned only by devices upgrading to Android 7.x or higher that didn’t previously support the bootloader changes required to get the flash lock status if they supported flashing lock/unlock capability.
|
|
| Returned by any device that doesn’t support flashing lock/unlock (that is, the device is always locked), or any device that supports flashing lock/unlock and is in the locked state. |
|
| Returned by any device that supports flashing lock/unlock and is in the unlocked state. |
Manufacturers should test the values returned by devices with locked and
unlocked bootloaders. For an example, the Android Open Source Project (AOSP)
contains a reference implementation that returns a value based on the
boot property. Example code is located in the
following directories:
Настройка Android
Чтобы начать работу с ADB, вы настроите некоторые параметры на своем устройстве Android. Если вы еще этого не сделали, активируйте параметры разработчика в настройках вашей системы. Шаги могут различаться в зависимости от вашего телефона, но, как правило, вы должны следовать следующим шагам:
- Зайдите в системные настройки вашего телефона.
- Найдите номер сборки вашего устройства в разделе «О телефоне» или аналогичном разделе.
- Коснитесь номера сборки семь раз, пока не появится сообщение «Теперь вы разработчик». Вам может быть предложено войти в свой экран.
- Найдите новые параметры разработчика , которые появятся в настройках вашей системы после выполнения предыдущего шага.
- В параметрах разработчика включите отладку по USB . Это подготовит ваше устройство к подключению ADB к вашему компьютеру (или выбранному вами клиенту).
- Если вы хотите подключить телефон к клиенту через Wi-Fi, включите переключатель отладки Wi-Fi вместо или в дополнение к отладке USB.

Мы рекомендуем отключать отладку по USB и беспроводную отладку, когда вы закончите с тем, что хотите сделать в ADB, по соображениям безопасности. Как уже упоминалось, эти шаги могут различаться в зависимости от вашего телефона, поэтому вам может потребоваться покопаться в настройках вашей системы, чтобы найти эти параметры.
Подготовка к перепрошивке андроид через adb
Перед тем как начать перепрошивку андроид-устройства с помощью adb, необходимо выполнить несколько подготовительных шагов. Эти шаги помогут вам избежать потери данных и убедиться, что ваше устройство готово для процесса перепрошивки.
1. Создайте резервную копию данных. Перед перепрошивкой андроид-устройства рекомендуется создать резервную копию всех важных данных, таких как фотографии, видео, контакты, сообщения и другие личные файлы. Это поможет восстановить данные в случае непредвиденных проблем.
2. Убедитесь, что ваше устройство заряжено
Перепрошивка андроид-устройства может занять некоторое время, поэтому важно убедиться, что устройство полностью заряжено или имеет достаточный уровень заряда батареи. В противном случае, если заряд устройства закончится во время процесса перепрошивки, это может привести к нежелательным последствиям
3. Включите режим разработчика на вашем устройстве. Режим разработчика дает доступ к различным настройкам андроид-устройства, которые обычно скрыты для обычных пользователей. Чтобы включить режим разработчика, перейдите в «Настройки» > «О телефоне» (или «О планшете») > «Информация о программном обеспечении» и тапните несколько раз на «Номер сборки». После этого вы должны увидеть уведомление о том, что режим разработчика включен.

4. Включите отладку по USB. После включения режима разработчика, вам нужно включить отладку по USB. Чтобы сделать это, перейдите в «Настройки» > «Режим разработчика» (или «Дополнительные настройки») > «Отладка по USB». Поставьте галочку рядом с этой опцией, чтобы включить отладку по USB.
5. Установите драйверы для вашего устройства на компьютере. Чтобы ваш компьютер мог взаимодействовать с андроид-устройством через adb, вам может потребоваться установить драйверы. Как установить драйверы зависит от производителя вашего устройства и операционной системы компьютера.
Примечание: Это предварительная подготовка и не описывает весь процесс перепрошивки андроид-устройства через adb. Для полной инструкции и указаний по процедуре перепрошивки обратитесь к документации и руководству пользователя вашего устройства или поищите онлайн инструкции и руководства, специфические для вашей модели андроид-устройства и версии операционной системы.
Select a device build
The recommended device builds are available from the
menu, accessed when running the command with no arguments.
For additional information on the command, see
.
For a list of build targets, see
.
You can download factory images and binaries for Pixel and Nexus devices from
developers.google.com.
See for downloads.
For details and additional resources, see .
| Device | Code name | Build configuration |
|---|---|---|
| Pixel 7 Pro | cheetah | |
| Pixel 7 | panther | |
| Pixel 6 Pro | raven | |
| Pixel 6 | oriole | |
| Pixel 5 | redfin | |
| Pixel 4a 5G | bramble | |
| Pixel 4a | sunfish | |
| Pixel 4 XL | coral | |
| Pixel 4 | flame | |
| Pixel 3a XL | bonito | |
| Pixel 3a | sargo | |
| Pixel 3 XL | crosshatch | |
| Pixel 3 | blueline | |
| Pixel 2 XL | taimen | |
| Pixel 2 | walleye | |
| Pixel XL | marlin | |
| Pixel | sailfish | |
| HiKey | hikey | |
| Nexus 6P | angler | |
| Nexus 5X | bullhead | |
| Nexus 6 | shamu | |
| Nexus Player | fugu | |
| Nexus 9 | volantis (flounder) | |
| Nexus 5 (GSM/LTE) | hammerhead | |
| Nexus 7 (Wi-Fi) | razor (flo) | |
| Nexus 7 (Mobile) | razorg (deb) | |
| Nexus 10 | mantaray (manta) | |
| Nexus 4 | occam (mako) | |
| Nexus 7 (Wi-Fi) | nakasi (grouper) | |
| Nexus 7 (Mobile) | nakasig (tilapia) | |
| Galaxy Nexus (GSM/HSPA+) | yakju (maguro) | |
| Galaxy Nexus (Verizon) | mysid (toro) | |
| Galaxy Nexus (Experimental) | mysidspr (toroplus) | |
| Motorola Xoom (U.S. Wi-Fi) | wingray | |
| Nexus S | soju (crespo) | |
| Nexus S 4G | sojus (crespo4g) |
Шаг 1. Настройте Android SDK
Направляйтесь к
Страница загрузки Android SDK
и прокрутите вниз до «Только инструменты SDK», который представляет собой набор инструментов, включающий ADB. Загрузите ZIP-файл для своей платформы и распакуйте его в любое место, где вы хотите хранить файлы ADB — они портативны, поэтому вы можете хранить их в любом месте.
Запустите SDK Manager EXE и снимите все флажки, кроме «Android SDK Platform-tools». Если вы используете телефон Nexus, вы также можете выбрать «Драйвер Google USB», чтобы загрузить драйверы Google. Щелкните кнопку Установить. При этом загружается и устанавливается пакет инструментов платформы, который содержит ADB и другие утилиты.
Когда все будет готово, вы можете закрыть диспетчер SDK.
Возможные проблемы
Если прошивка не установилась или телефон просто не запускается после обновления, обратите внимание на следующие возможные причины и способы их решения:
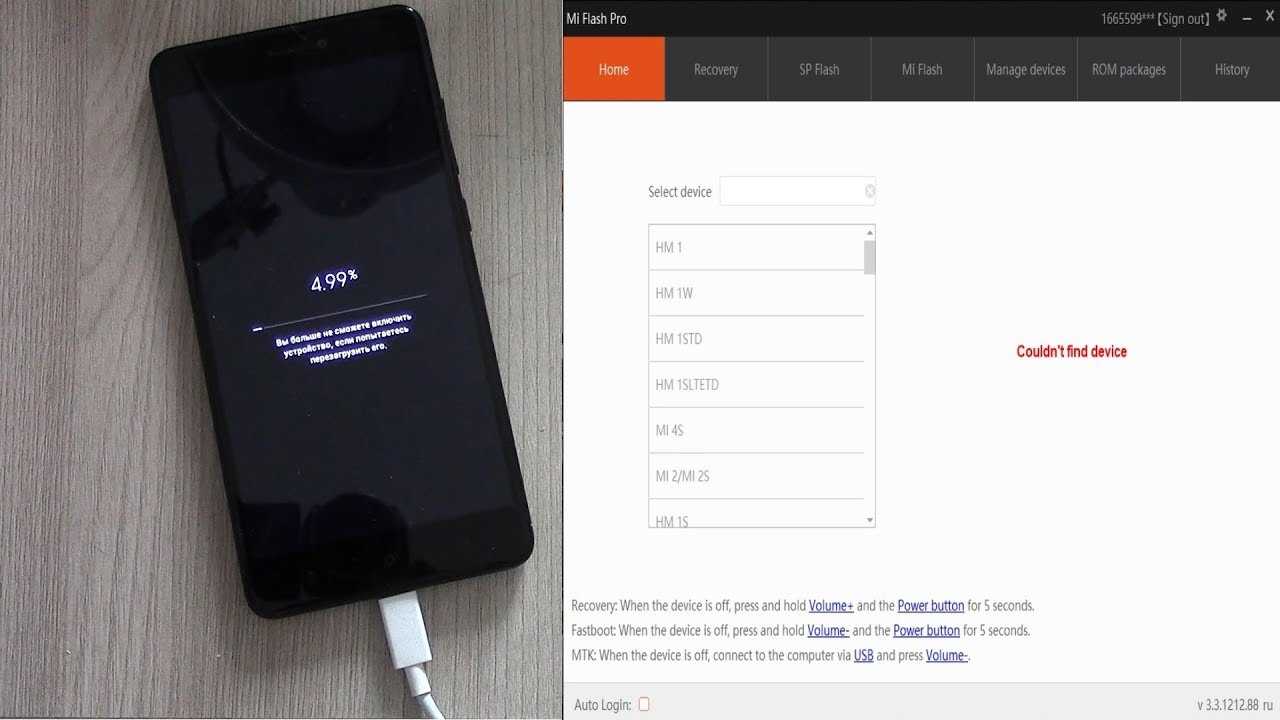
- Поврежденный файл прошивки. Архив мог быть скачан с ненадежного источника или некорректно распакован, посмотрите нашу последовательную видео-инструкцию. Загрузите другую версию и обязательно отключите антивирус, иначе он удалит необходимые элементы.
- Во время перепрошивки телефон полностью разрядился. Такое бывает, если в начале операции остается меньше 30% заряда. Не подключайте смартфон сразу к зарядке, если недавно перепрошивали. Здесь нужно уже разобрать телефон и извлечь аккумулятор (в таком случаем без разборки никак) и через 10-15 минут вставьте вновь. Попробуйте включить. Не получается? Тогда ставьте на зарядку и через полчаса повторите попытку.
- Поврежденный кабель или загрязненные USB-разъемы. Самая банальная, но довольно частая причина. Перегорели проводки, в порт попал инородный предмет, кабель шнур – и вот уже ни о каком успешном подсоединении к компьютеру не может быть и речи.
Install an App on Your Device
When you download an application from a source other than Google Play, you may have to push that application from your laptop to your smartphone or tablet as an APK file.
To install an APK file, you just need to specify that APK’s location:
adb install APKLocation
For example, to install an APK named MTE.apk that’s stored on the Desktop, you’d run the following command:
adb install UsersseconDesktopMTE.apk
This APK file will then be pushed to Android and installed automatically.
If you want to update an existing app, use the following:
adb install -r APKLocation
Also read: How to Turn an Amazon Fire Tablet into a Stock Android Device (Almost)
Usage
Connect device
Tip:
- For some devices, you may have to enable MTP on the device, before ADB will work. Some other devices require enable PTP mode to work.
- Many devices’ udev rules are included in , so if you have this installed, the following steps may not be necessary.
- Make sure your USB cable is capable of both charge and data. Many USB cables bundled with mobile devices do not include the USB data pin.
To connect to a real device or phone via ADB under Arch, you must:
- You might want to install if you wish to connect the device to the proper entries.
- plug in your android device via USB.
- Enable USB Debugging on your phone or device:
- Jelly Bean (4.2) and newer: Go to Settings > About Phone tap Build Number 7 times until you get a popup that you have become a developer. Build number may be under a menu called Software info on newer Android OS versions. Then go to Settings > Developer > USB debugging and enable it. The device will ask to allow the computer with its fingerprint to connect. Check allowing it permanently option will copy to the target phone’s location.
- Older versions: This is usually done from Settings > Applications > Development > USB debugging. Reboot the phone after checking this option to make sure USB debugging is enabled.
If ( shows it as , or it is visible and accessible in IDE), you are done. Otherwise see the instructions below.
Figure out device IDs
Each Android device has a USB vendor/product ID. An example for HTC Evo is:
vendor id: 0bb4
product id: 0c8d
Plug in your device and execute:
$ lsusb
...
Bus 002 Device 006: ID 0bb4:0c8d High Tech Computer Corp.
...
Adding udev rules
If your device is not included in (or AUR), use the following template to create a custom udev rule by replacing and with .
/etc/udev/rules.d/51-android.rules
SUBSYSTEM=="usb", ATTR{idVendor}=="", MODE="0660", GROUP="adbusers", TAG+="uaccess"
SUBSYSTEM=="usb", ATTR{idVendor}=="", ATTR{idProduct}=="", SYMLINK+="android_adb"
SUBSYSTEM=="usb", ATTR{idVendor}=="", ATTR{idProduct}=="", SYMLINK+="android_fastboot"
Then .
Detect the device
After you have setup the udev rules, unplug your device and replug it.
After running:
$ adb devices
List of devices attached
HT07VHL00676    device
If adb still does not detect the device after plugging your device back in, kill and restart the adb server as root and check devices again:
# adb kill-server
# adb start-server
$ adb devices
If adb devices still shows unauthorized next to your device, make sure that that device has debugging permission allowed on the device itself. A Allow USB Debugging? dialog should be presented when you physically connect the device. Select Always Allow…, then tap OK. If the dialog was never presented, try Settings > Developer Options > Revoke USB Debugging Authorizations, then tap OK, and repeat the steps in this section. If you still do not see the Allow USB Debugging? dialog, and the device is listed as unauthorized, then enter the Developer Options on the device and first uncheck USB Debugging and then check it again.
Transferring files
You can now use adb to transfer files between the device and your computer. To transfer files to the device, use:
$ adb push what-to-copy where-to-place
To transfer files from the device, use:
$ adb pull what-to-pull where-to-place
Also see .
Backup and restore
Note: adb backup is deprecated and may be removed in a future release.
You can also backup and restore your device with adb. Moreover, no root is required to follow the process. The commands below led to backup your device to a single file which can also be successively restored.
![How to flash custom rom using adb sideload [easy steps]](https://mtrufa.ru/wp-content/uploads/f/3/3/f33ca6097e7f5e5fe7169cbdcf95aaf5.png)


The command to create a backup is:
$ adb backup -apk -shared -all -f backupFileName.ab
The command parameters list is:
adb backup
Then confirm the process on your device’s display and provide a password whether a backup password has been set before.
The command to restore a previous backup is:
$ adb restore backupFileName.ab
Note: Remember that restoring operation will replaces your device contents with the backup contents.
Инструкция по установке обновления через ADB
Установка обновления через ADB включает выполнение предварительных действий для корректной работы:
- зарядка батареи мобильного телефона более, чем на 60% (для удобства установки лучше, чтобы аккумулятор был полностью заряжен);
- включение отладки с помощью USB;
- установка драйверов устройства на компьютер и последующее их тестирование (устройство должно быть «найденным»);
- загрузка необходимого файла (file.zip). Будьте острожными и скачивайте файлы только с проверенных источников, чтобы не навредить компьютеру (лучше всего использовать услуги порталов производителя смартфона, с помощью supersu – программы, которая позволяет получить права «супер пользователя» – особые преимущества);
- загрузка пакета Android SDK на ПК.
После проведения «предварительных работ» загрузите Platform-Tools (специальный инструмент, который необходим для установки кастомного рекавери и рутирования телефона). Далее распакуйте zip.file.
Выполните следующие действия:
- Подключите телефон к компьютеру USB-кабелем и убедитесь, что ПК «опознал» устройство.
- Откройте распакованную папку и нажмите «Shift», щелкните правой кнопкой мыши.
- На панели задач щелкните мышью на «открыть командную сроку».
- После введите команду «adb devices». Это поможет определить правильно ли установили компонент. Получение серийного номера – признак корректной работы.
- Переместите файл.
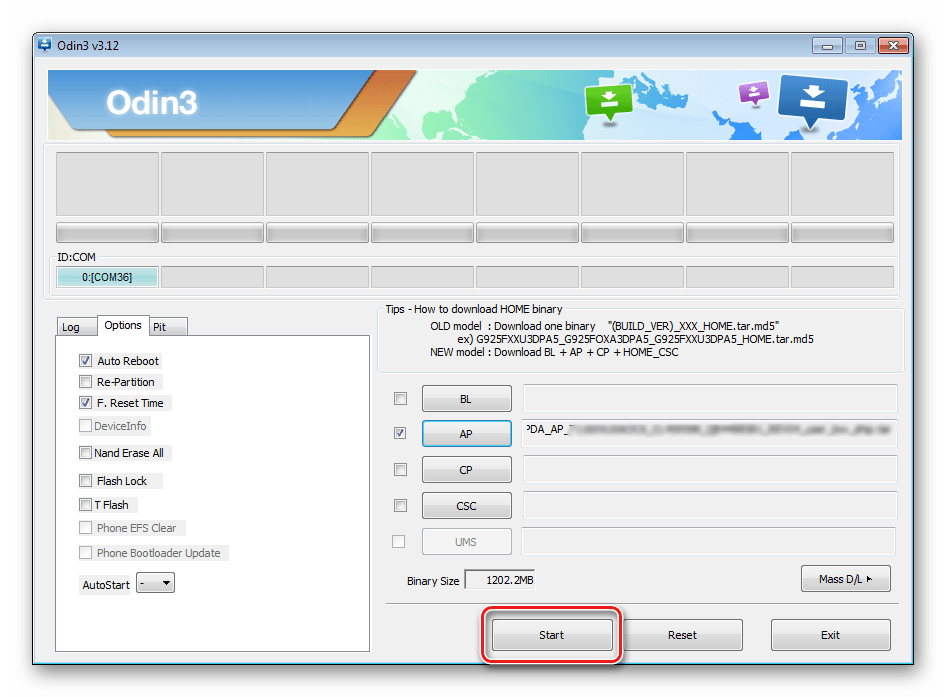
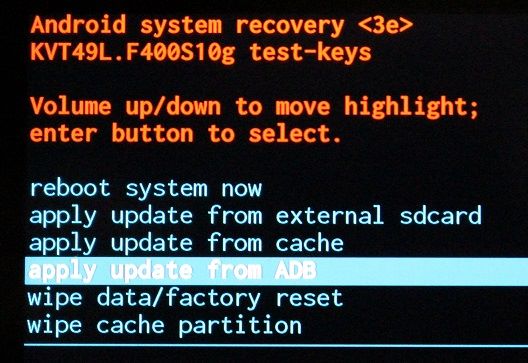
- Загрузите смартфон в режиме восстановления. Полностью выключите гаджет, потом зажмите на несколько секунд клавишу, регулирующую громкость звука. Этими же клавишами выберите «Apply update from ADB» и нажмите на «Питание».
- Вернитесь к ПК и в окне командной строки напечатайте «adb sideload имя файла прошивки».
После Android открывает файл и проверяет его, загружает на телефоне. Не переживайте, если долго не открывается – это нормально. Не стоит прекращать процесс на полпути, поскольку файл не откроется после и придется заново повторить действия. Завершенный процесс «оповещается» «Install from ADB complete». То есть, для выполнения поставленной задачи необходимы следующие «инструменты» Android SDK, WinRar (для распаковки архива), Windows PC, USB Кабель, Rooted HTC Dream (Google G1).
Если у Вас остались вопросы или есть жалобы – сообщите нам
Ваш IT помощник
Когда пользователь хочет обновить прошивку своего Андроид устройства, он сталкивается в меню Recovery с опцией «Apply update from adb». Мы расскажем что это такое и за что отвечает ADB на Андроиде.
Многих пользователей Android интересует вопрос, — каким образом можно модифицировать имеющуюся прошивку и тем самым получить более новую? Помочь в такой ситуации может отладочный мост от Android, который имеет аббревиатуру ADB. С помощью этой опции можно управлять любым устройством с операционной системой Android, если производитель не закрыл доступ к данному функционалу. Стоит сказать, что принцип работы АДБ имеет клиент-серверную основу.
Apply update from ADB (переводится как — Применить обновления Отладочного Моста Андроид) — функция управления телефоном, используемая при обновлении, восстановлении или кастомной прошивке системы.
What is ADB Sideload?
ADB sideload was a new feature which was added to the stock Android recovery (AOSP Recovery) in Android Jelly Bean. ADB sideload is a different variant of the ADB mode which you can use to push and install a zip file on your Android device, using one command from your computer.
You would even see this option in your stock Android recovery if you try to update your device with the latest OTA Zip file. While this particular ADB Sideload option is not very useful for normal users, it’s a blessing for the advanced users and ROM Developers.
Simply put, with ADB Sideload option, you can simply PUSH any compatible .zip file to your Android device from a computer and install the same one to your device.